In the previous session we went over the Pentax AF 360 FGZ settings in detail. This session we're going to piggy back on that and discuss what the bigger brother the AF 540 FGZ
Showing posts with label pentax. Show all posts
Friday, September 25, 2009
The Big Brother AF 540 FGZ
In the previous session we went over the Pentax AF 360 FGZ settings in detail. This session we're going to piggy back on that and discuss what the bigger brother the AF 540 FGZ
Labels:
af540fgz,
pentax,
pentax flash
Sunday, May 31, 2009
The Pentax AF360FGZ In Detail
I started the Pentax wireless flash sessions but I just realized I have not discussed the flash or flash controls in any detail yet like I have for the camera controls.
So here we start the discussion on the AF 360 FGZ
.
So here we start the discussion on the AF 360 FGZ
Tuesday, April 28, 2009
Cleaning the Inevitable Dirty Sensor
Sooner or later it happens to all DSLR owners. The sensor gets enough dirt, dust and grime on it that it begins to show in your images and is taking too much time in PP work to remove.
A quick simple wipe of the sensor did the trick for me. Check it out in the full post.
Labels:
cotton swab,
dirty sensor,
glass cleaner,
K10D,
pentax,
sensor cleaning
Thursday, April 23, 2009
Dual Strobe Lighting P-TTL
In the last article in this series we talked about using a single strobe in wireless P-TTL mode to light a portrait. Now it's time to move on to the first article in dual strobes, one to light the subject and one to light the subject.
As you can see comparing this photo to the ones in the previous article the background is fully lit and there is much better separation between the subject and the background. You'll notice some kick light on the subjects temple and hair. A kick light, or kicker, is a separate light that is used to highlight a certain spot on the subject. Similar to a hair light, a kicker is used to highlight certain parts like cheekbones, lips, jewelery etc, where a hair light will only be placed on the hair.
Labels:
K10D,
pentax,
pentax flash,
portrait,
portrait lighting,
wireless p-ttl
Monday, April 6, 2009
Remote Focus Trap
Imagine setting the camera on a tripod and focusing the lens at a predefined area and when something moves into the focus area the camera automatically captures the image. This is what is called focus trap and in this sense it is a "real" focus trap where no human intervention is needed to release the shutter. The subject being photographed triggers the camera shutter via the focus sensor.
Saturday, April 4, 2009
Focus Trap or Catch In Focus
Ever wished you could take well focused action photos with your manual lens or slow auto focus lens? Tired of the percentage of usable shots being low? Well with a little known trick, and I believe a Pentax only trick, you can get your camera to take photos automatically when the subject comes into focus.
Labels:
catch in focus,
focus trap,
K10D,
manual focus,
pentax
Tuesday, March 3, 2009
Umbrella Fill Patterns
Now that we've all got our light stands and umbrellas we need to find the optimum flash zoom length and umbrella/flash distance that will fill the umbrella without any spill over. Spill over is the flash light that is at such a wide angle that it extends past the edge of the umbrella. This light is wasted and can cause unwanted reflected/bounced fill in you images. So we need to completely fill the umbrella so we have the largest light source possible and yet keep the spill over at the minimum.
Labels:
K10D,
pentax,
pentax flash,
umbrella fill patterns,
wireless p-ttl
Flash and Exposure Modes
Depending on the exposure mode you have selected, your choices of flash mode change.
In this article we'll briefly discuss the flash modes available for each of the exposure modes.
Labels:
dial functions,
digital photography,
example,
exposure modes,
flash modes,
function menu,
howto,
K10D,
manual,
mode,
pentax
Tuesday, February 24, 2009
Shooting in TAv Mode
In the previous post I mentioned that I was shooting TAv mode. I needed the higher shutter speed as I was hand holding a 300mm tele and needed a bit of depth of field so that most of the squirrel was in focus and the lighting was mixed sun to varying depths of shade as I was chasing the squirrels around the yard. In this article I will talk a bit about the humble TAv mode.
Sunday, February 15, 2009
Pentax Wireless P-TTL (Part 2)
In Part 1 we talked about the camera/flash configuration. In this article we're going to talk about how to use the single flash with the camera.
The camera built in flash acts as the commander that controls the remote flash (slave). The commander sends signals to the slave flash and in P-TTL mode tells the slave flash to fire so it can calculate the exposure according to the camera/flash settings. There is a lot going on here in just a few milliseconds and it all happens in a few exchanges of light between the commander and slave flashes.
So let's get going.
I'll start off with a word of caution!
NEVER fire the flash when the flash head pressed up against an object that blocks the output of the flash head. The flash will fire at full power and a lot of heat is generated that will burn or melt the object against the flash head and may fry your flash bulb. I have done it and left a rectangle shaped scorch mark on a suede shoe. I was lucky that I did not fry the flash bulb but the flash head got so hot that it melted the plastic that supports the fresnel lens and produced a nasty odor of burnt plastic. So be careful where you place the remote flash and pay attention to not let any flammable materials get near the fresnel lens.
You won't need any thing but your camera and your flash but be sure you have set your flash and camera to the same channel as described in the previous post.
1.Turn the on the flash, set flash to wireless and turn the camera on.
2.Make sure the flash is set to slave mode.
- Press the Master/Control/Slave button on the flash until Slave appears in the LCD screen.
3.Make sure the flash is in P-TTL mode.
- Press the MODE button on the flash until P-TTL shows on the LCD screen.
4.Make sure the camera is set to wireless mode.
- Press the Fn button.
- Press the 4 way control button down to select the flash settings.
- Scroll to the wireless setting (W with lightning bolt)
- Press OK twice to exit the Fn menu.
5.Set the camera mode to Program mode (P) for now. We'll get to Av and Tv modes in a future article.
6.Set the built in flash to not fire during exposure.
- Press the menu button.
- Scroll left once time to the Custom Setting menu.
- Scroll up twice to the Flash in Wireless mode.
- Scroll right and select option 2 (Off).
You are now ready to shoot with the remote flash in wireless P-TTL mode. You're going to need a wider angle lens most likely or a close focus macro lens is actually perfect for this type of flash work. I've used this setup to take macro shots of flowers and insects. It's great for that quick catch that won't wait for a complete macro flash setup.
Before we take any real photos we're going to take a look at all the flashes that are happening during the photo taking process.
Lay the remote flash on a table or chair with the flash pointing away from your eyes and the front of the flash pointed up. The front of the flash contains the sensor that picks up the signals from the commander flash on the camera so it has to see what's going on. If you have the sensor pointing down on the table it may not see the signals from the commander flash.
Point the camera up and at an angle away from your eyes so you can see the commander flash from the side but so it will not directly blind you.
Release the shutter (you may have to set the camera to manual focus if it can't focus on the wall or ceiling) and notice the commander flash fires twice. I'm not exactly sure what each flash does, but since the commander flash has been told not to fire during exposure then we know all it is doing is communicating with the slave flash.
The slave flash also fires twice, the first one is the pre flash (the P in P-TTL) and the second is the actual flash used in the exposure.
Now let's take a picture of something.
First frame the subject in the camera before you even hold the flash up in the air. Your arm will get very tired very soon so give it a break.
Once the zoom/focus have been set to frame the subject how you like, hold the flash up and out in your left hand and point it at the subject. The further from the camera the better.
Keeping both eyes open, pre-focus the camera on the subject, hold your breath and gently release the shutter.
A few things you may have noticed, you actually saw the subject lit up with the flash through the view finder and then the viewfinder went black and you saw a repeat flash with your other eye that lit up the subject (or the room if you can't see the subject with your other eye.
The flashes are pretty fast, so if you want close your non viewfinder eye and just notice that you do see a flash through the viewfinder before the shutter released.
Now close the viewfinder eye and you will notice 2 very close flashes.
The first flash is the pre flash which the camera uses to set the exposure of the frame depending on how the camera is set up. In P mode the camera adjusts the shutter speed and aperture to what it thinks best fits the scene and then tells the remote flash what power to fire at.
The second flash fires while the shutter is open and the camera captures the image.
That's all there is as far as the average photographer needs (or wants) to know about P-TTL. The details are more complicated but you don't need to know the details to get the job done.
Stay tuned for the next article due in a couple of weeks. We'll discuss how to properly set up the flash zoom and umbrella shaft distance to produce the optimum flash fill pattern.
The camera built in flash acts as the commander that controls the remote flash (slave). The commander sends signals to the slave flash and in P-TTL mode tells the slave flash to fire so it can calculate the exposure according to the camera/flash settings. There is a lot going on here in just a few milliseconds and it all happens in a few exchanges of light between the commander and slave flashes.
So let's get going.
I'll start off with a word of caution!
NEVER fire the flash when the flash head pressed up against an object that blocks the output of the flash head. The flash will fire at full power and a lot of heat is generated that will burn or melt the object against the flash head and may fry your flash bulb. I have done it and left a rectangle shaped scorch mark on a suede shoe. I was lucky that I did not fry the flash bulb but the flash head got so hot that it melted the plastic that supports the fresnel lens and produced a nasty odor of burnt plastic. So be careful where you place the remote flash and pay attention to not let any flammable materials get near the fresnel lens.
You won't need any thing but your camera and your flash but be sure you have set your flash and camera to the same channel as described in the previous post.
1.Turn the on the flash, set flash to wireless and turn the camera on.
2.Make sure the flash is set to slave mode.
- Press the Master/Control/Slave button on the flash until Slave appears in the LCD screen.
3.Make sure the flash is in P-TTL mode.
- Press the MODE button on the flash until P-TTL shows on the LCD screen.
4.Make sure the camera is set to wireless mode.
- Press the Fn button.
- Press the 4 way control button down to select the flash settings.
- Scroll to the wireless setting (W with lightning bolt)
- Press OK twice to exit the Fn menu.
5.Set the camera mode to Program mode (P) for now. We'll get to Av and Tv modes in a future article.
6.Set the built in flash to not fire during exposure.
- Press the menu button.
- Scroll left once time to the Custom Setting menu.
- Scroll up twice to the Flash in Wireless mode.
- Scroll right and select option 2 (Off).
You are now ready to shoot with the remote flash in wireless P-TTL mode. You're going to need a wider angle lens most likely or a close focus macro lens is actually perfect for this type of flash work. I've used this setup to take macro shots of flowers and insects. It's great for that quick catch that won't wait for a complete macro flash setup.
Before we take any real photos we're going to take a look at all the flashes that are happening during the photo taking process.
Lay the remote flash on a table or chair with the flash pointing away from your eyes and the front of the flash pointed up. The front of the flash contains the sensor that picks up the signals from the commander flash on the camera so it has to see what's going on. If you have the sensor pointing down on the table it may not see the signals from the commander flash.
Point the camera up and at an angle away from your eyes so you can see the commander flash from the side but so it will not directly blind you.
Release the shutter (you may have to set the camera to manual focus if it can't focus on the wall or ceiling) and notice the commander flash fires twice. I'm not exactly sure what each flash does, but since the commander flash has been told not to fire during exposure then we know all it is doing is communicating with the slave flash.
The slave flash also fires twice, the first one is the pre flash (the P in P-TTL) and the second is the actual flash used in the exposure.
Now let's take a picture of something.
First frame the subject in the camera before you even hold the flash up in the air. Your arm will get very tired very soon so give it a break.
Once the zoom/focus have been set to frame the subject how you like, hold the flash up and out in your left hand and point it at the subject. The further from the camera the better.
Keeping both eyes open, pre-focus the camera on the subject, hold your breath and gently release the shutter.
A few things you may have noticed, you actually saw the subject lit up with the flash through the view finder and then the viewfinder went black and you saw a repeat flash with your other eye that lit up the subject (or the room if you can't see the subject with your other eye.
The flashes are pretty fast, so if you want close your non viewfinder eye and just notice that you do see a flash through the viewfinder before the shutter released.
Now close the viewfinder eye and you will notice 2 very close flashes.
The first flash is the pre flash which the camera uses to set the exposure of the frame depending on how the camera is set up. In P mode the camera adjusts the shutter speed and aperture to what it thinks best fits the scene and then tells the remote flash what power to fire at.
The second flash fires while the shutter is open and the camera captures the image.
That's all there is as far as the average photographer needs (or wants) to know about P-TTL. The details are more complicated but you don't need to know the details to get the job done.
Stay tuned for the next article due in a couple of weeks. We'll discuss how to properly set up the flash zoom and umbrella shaft distance to produce the optimum flash fill pattern.
Labels:
K10D,
pentax,
wireless p-ttl
Pentax Wireless P-TTL (Part 1)
Last issue we talked about Wireless Flash Preparation. In this article we're going to talk about the hardware (camera/flash) configuration.
The Pentax wireless system uses 1 of 4 available channels. So first we need to make sure that the camera and all the flashes are on the same channel.
Let's first set the flash channels. Do the following steps for each flash you will be using.
1.Set the power on each flash to the wireless position (midway between the on and off positions).
2.Slide the setting switch down (toward modeling).
3.Press the zoom/ch. button until the desired channel is displayed.
4.Slide the setting switch up (toward test).
Now that we have all the flashes set to the same channel we need to set the camera to that channel also.
1.Turn off one of the flashes.
2.Make sure the camera is off.
3.Mount the flash to the camera.
4.Set the flash power to the wireless position.
5.Turn the camera on.
6.Make sure the mode dial is not set to Green Mode. Set it to P Mode or any *v Mode.
7.Press the function button beside the shake reduction switch.
8.Press the 4 way controller down to the flash position.
9.Scroll right to the wireless setting (W with a lightning bolt).
10.Press the 4 way controller OK button.
11.Press the 4 way controller OK button once more to exit the function setup.
12.The top LCD display will show the channel that the flash is set to and show the camera in wireless mode.
13.Turn the flash and camera off.
14.Remove the flash.
The camera is now set to the same channel as all the flashes and ready for wireless P-TTL
In the next session we will do some simple wireless setups using one flash.
[edit May 30 2009: added specific photos for directions]
The Pentax wireless system uses 1 of 4 available channels. So first we need to make sure that the camera and all the flashes are on the same channel.
Let's first set the flash channels. Do the following steps for each flash you will be using.
1.Set the power on each flash to the wireless position (midway between the on and off positions).
2.Slide the setting switch down (toward modeling).
3.Press the zoom/ch. button until the desired channel is displayed.
4.Slide the setting switch up (toward test).
Now that we have all the flashes set to the same channel we need to set the camera to that channel also.
1.Turn off one of the flashes.
2.Make sure the camera is off.
3.Mount the flash to the camera.
4.Set the flash power to the wireless position.
5.Turn the camera on.
6.Make sure the mode dial is not set to Green Mode. Set it to P Mode or any *v Mode.
7.Press the function button beside the shake reduction switch.
8.Press the 4 way controller down to the flash position.
9.Scroll right to the wireless setting (W with a lightning bolt).
10.Press the 4 way controller OK button.
11.Press the 4 way controller OK button once more to exit the function setup.
12.The top LCD display will show the channel that the flash is set to and show the camera in wireless mode.
13.Turn the flash and camera off.
14.Remove the flash.
The camera is now set to the same channel as all the flashes and ready for wireless P-TTL
In the next session we will do some simple wireless setups using one flash.
[edit May 30 2009: added specific photos for directions]
Labels:
K10D,
pentax,
wireless p-ttl
Saturday, February 14, 2009
Pentax Wireless P-TTL Flash System (Preparation)
It's been a while, but life's been in the way.
In theses next few sessions we're going to learn how to use the K10D's built-in flash to control 1 or more external flashes.
I recommend you have the following to make life easier:
- K10D
- Tripod
- Remote shutter release – wire or wireless (camera shutter timer will work too but slower)
- External Flash (Either 1, 2 or more of one type or 1 or more of each AF360FGZ AF540FGZ)
- Light stand(s) (one for each flash)
- Light modifiers (umbrella/softbox etc)
- Flash/Modifier/Stand clamp used to mount the flash and umbrellas/softbox to the top of the light stand
- Background setting (backdrop canvas/blank neutral color wall/outdoor scene etc)
- Subject to shoot (self portraits are OK but slower)
OK, a caveat on the above list. You'll really only need the camera and 1 flash to experiment with the wireless system. You'll need some way to hold the flash while shooting your subjects. I have held the camera in one hand and the flash in the other hand. I've shot macro, portrait and events using this method. It gets very tiring after a while, but it can be done. That being said you will be limited with what you can follow along with in the next few sessions. However, I will cover 1 flash setup so you can get started on wireless and learn how to use it properly.
If you are in the market for a light stand kits take a look at the kits available from Midwest Photo Exchange. I am not an affiliate nor can I recommend their products as I have never used any of them.
The light stand, umbrella and the adapter are all you will need to mount your flash(s) and they can be ordered separately from the kits. Be careful ordering the kits as some come with flashes/radio triggers and some don't. If you have Pentax P-TTL flashes then you won't need these.
Don't forget to order a set for each flash.
I will have 1 each AF540FGZ and AF360FGZ flash and 2 light stands with shoot through umbrellas to go along with my K10D, tripod and remote shutter release.
Next session, Pentax Wireless P-TTL Flash (Part 1).
In theses next few sessions we're going to learn how to use the K10D's built-in flash to control 1 or more external flashes.
I recommend you have the following to make life easier:
- K10D
- Tripod
- Remote shutter release – wire or wireless (camera shutter timer will work too but slower)
- External Flash (Either 1, 2 or more of one type or 1 or more of each AF360FGZ AF540FGZ)
- Light stand(s) (one for each flash)
- Light modifiers (umbrella/softbox etc)
- Flash/Modifier/Stand clamp used to mount the flash and umbrellas/softbox to the top of the light stand
- Background setting (backdrop canvas/blank neutral color wall/outdoor scene etc)
- Subject to shoot (self portraits are OK but slower)
OK, a caveat on the above list. You'll really only need the camera and 1 flash to experiment with the wireless system. You'll need some way to hold the flash while shooting your subjects. I have held the camera in one hand and the flash in the other hand. I've shot macro, portrait and events using this method. It gets very tiring after a while, but it can be done. That being said you will be limited with what you can follow along with in the next few sessions. However, I will cover 1 flash setup so you can get started on wireless and learn how to use it properly.
If you are in the market for a light stand kits take a look at the kits available from Midwest Photo Exchange. I am not an affiliate nor can I recommend their products as I have never used any of them.
The light stand, umbrella and the adapter are all you will need to mount your flash(s) and they can be ordered separately from the kits. Be careful ordering the kits as some come with flashes/radio triggers and some don't. If you have Pentax P-TTL flashes then you won't need these.
Don't forget to order a set for each flash.
I will have 1 each AF540FGZ and AF360FGZ flash and 2 light stands with shoot through umbrellas to go along with my K10D, tripod and remote shutter release.
Next session, Pentax Wireless P-TTL Flash (Part 1).
Labels:
K10D,
pentax,
wireless p-ttl
Tuesday, June 24, 2008
K10D Focus Error Adjustment
I'm really excited today. I found an article on how to get back into debug mode on the Pentax K10D and I deciphered the Auto Focus Test/Adjustment feature. Yeah me!
I did all the experiments and adjustments earlier and took photos of the procedure.
(edit 18 Ssep 2010 - Pentax Focus Chart)
INGREDIENTS
- Tripod
- Low Flat surface (the floor is fine if U have a good back)
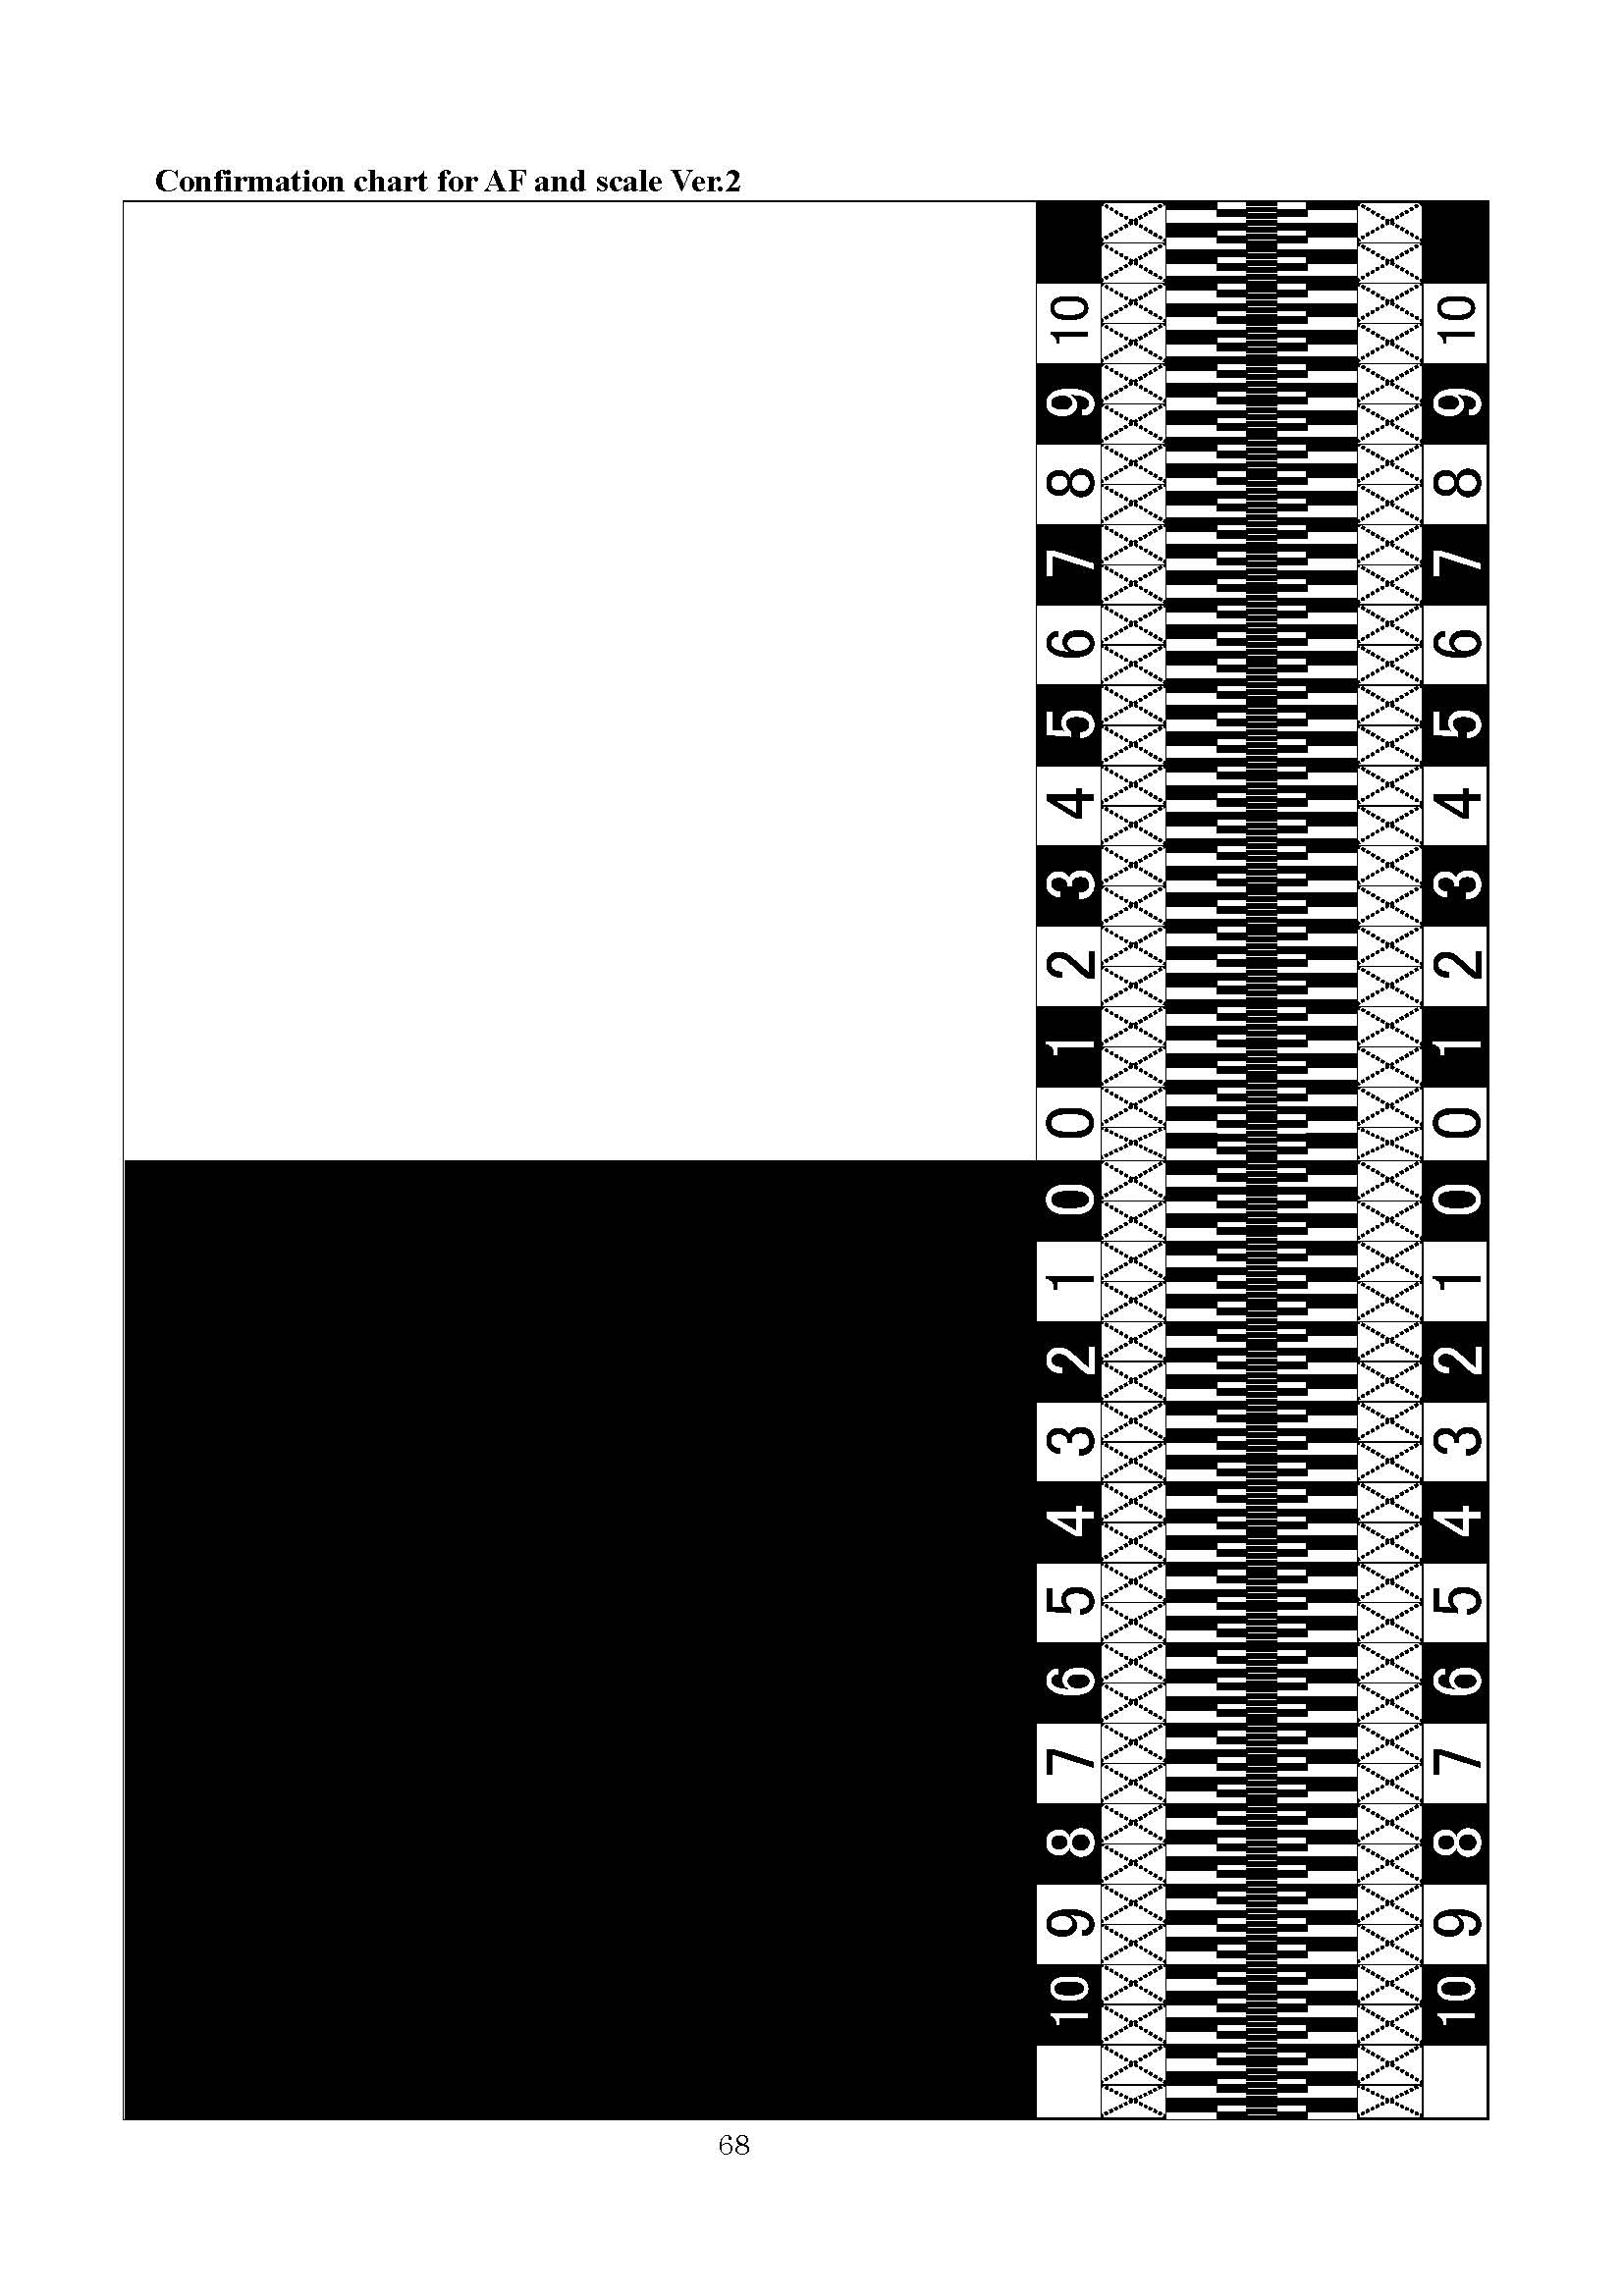
- Focus chart (you can find one here)
- The lens you want to test and or correct for
-Writing paper
- Pen or Pencil
- Spectral Flux Capacitor (optional, but I had one lying around)
Pre set up
Put the camera on the tripod and set the angle to 45 degrees looking down. If you don't have a way to measure 45 degrees, remember your geometry. Any square object has a 45 degree line if you draw one from one corner to the opposite corner. Fold a piece of paper so when folded from a corner the top aligns flush with the side. The fold created will be 45 degrees.
[edit 11 Apr 09: 45 degrees is not a magic number. You can use any angle. The angle changes how far in front of and behind the focus point the image appears out of focus. If the DoF is too small it may make it hard to count how far the lens is out of focus. You can change the viewing angle so the chart is closer to perpendicular (like a wall) so there are more numbers to count within the DoF. If the DoF is too large then the edge of focus may be beyond the scale of the chart. In this case adjust the viewing angle so it is closer to parallel (like the ground) and the numbers at the extreme ends of the chart will be more out of focus. For the most part though 45 degrees will work. I just wanted to point out that the angle used does not need to be exact and will have no bearing on the outcome other than changing the count of the numbers within the DoF.]
Don't fold your focus chart.
Put the focus chart on a flat surface.
The camera to focus chart distance will depend on the minimum focus distance of the lens you are testing. You will have to adjust the tripod height and/or place the chart at varying heights in order to be able to focus at the min focus distance. You will want to use the minimum distance as the depth of field is narrowest at that point and will show focus error better. Also use the widest aperture as this also narrows the depth of field. Leave a little room so the camera can focus a little in either direction of the correct focus so it can have the opportunity to create the focus error.
Never re-adjust the 45 degree angle during the test. Wrap something around the handle to remind you when you grab it. Use barbed wire if you have to, or jelly if your not into SM. If you are, then don't use barbed wire or you'll never complete the test.
Either move the tripod or the focus chart around in order to set the focus point on the mark. If you are testing a lens with a large focus distance then it will take some trial and error.
Tape the chart in place if it's prone to being moved accidentally.
Keep kids, dogs, cats, farm animals out of the testing area. This is a laboratory now and should be treated as one.
OK, now on to the meat.
1. Go into the AF Test Menu from the debug menu. It's at the bottom of the Setup Menu if the camera is in debug mode. If your camera is not in debug mode read this.
About the AF Test Areas. I'm not sure what area 0 really does, but I think nothing. Area 1 uses both a horizontal and a vertical focus pattern. So it does not matter what way the camera is rotated it will focus on the focus chart. Area 2 uses a Horizontal focus pattern. Area 3 uses a vertical focus pattern and you will have to rotate the camera 90 degrees in order for it to focus on the lines.
Note: If you adjust the value (say to +40) and hit OK, then the next time you adjust the value it will start counting at zero from that +40 point. So lets say we're going to go back to 0, it will read -40 when at the mark instead of 0. Also the increment steps are in 10.
2. Start with Focus Area 1. You select the focus areas with the left-right arrows on the 4-way controller.
To move between the focus area option and the adjustment amount use the up-down arrows on the 4-way controller.
4. Leave the focus adjustment at 0.
5. Press OK.
6. Manually defocus the lens.
7. Half press the shutter button a few times until the camera no longer tries to focus when you press the button. You should be focusing on the end of the text (the 'us') that reads "This text should be perfectly in focus".
8. Take a picture.
9. Go back in to the focus adjustment menu and select +40.
10. Manually defocus the lens again.
11. Half press the shutter several times until the camera doesn't try to focus anymore.
12. Take a picture.
13. Repeat steps 9-12 for a -40 adjustment. Remember you're going back -80 points to get to -40 from +40. Don't stop when it reads -40 or you will be back at 0 again.
14. Now load those 3 images into your photo editing software and view them at a magnification that you can clearly see the depth of field and where the front and rear out of focus areas.
From the images you can figure out which direction you need to correct, if any at all.
15. Repeat the focus correction procedure moving the focus point in the direction that continues to improve the focus until you have obtained the best focus.
Here are my results. Yours will differ so don't expect them to match.
I went into the AF Test menu and for all test areas, 1, 2, and 3, I set the focus to +40, 0, and -40 um. I did not see any difference in the outcome. So pick 1 or 3 and use the focus chart in vertical (as intended) direction and the camera in landscape.
I focused on the end of the text that reads "This line should be in perfect focus."
From looking at the different images I noticed that the -40um was the closest to being centered.
So I choose -50um as my correction and it seems bang on.
I should note that I tried math to figure out the correction value. I found 2 areas (one front and one back) that were equally out of focus. I subtracted the smaller value from the larger value and divided by 2 to get my correction value. However I had no way to equate my calculated value to the correction value in the camera. I though 10um meant 10 micro millimeters so when I calculated I had 6mm of front focus error I'm pretty close to my -50um correction value that I used. The problem with this method is with out more advanced scientific test equipment it's hard to get the exact numbers. I mean, we're using the human eye. Yes the eye is a great piece of test equipment, but the perception lacks. Just ask 10 different people to figure out your focus correction value and you'll get a dozen different answers.
I tried to use the spectral flux capacitor to help calculate the focus correction, but I think it needs an alignment itself. I never got a manual with it when I bought it off E-Bay, that's why the price was so good. Maybe some day when I want to kill some more cats I'll take it apart and fix it too.
Until then, enjoy your camera and stay away from all this extreme weather we're having.
Next we're going to prepare for session in the Pentax Wireless P-TTL flash system.
I did all the experiments and adjustments earlier and took photos of the procedure.
(edit 18 Ssep 2010 - Pentax Focus Chart)
INGREDIENTS
- Tripod
- Low Flat surface (the floor is fine if U have a good back)
- Focus chart (you can find one here)
- The lens you want to test and or correct for
-Writing paper
- Pen or Pencil
- Spectral Flux Capacitor (optional, but I had one lying around)
Pre set up
Put the camera on the tripod and set the angle to 45 degrees looking down. If you don't have a way to measure 45 degrees, remember your geometry. Any square object has a 45 degree line if you draw one from one corner to the opposite corner. Fold a piece of paper so when folded from a corner the top aligns flush with the side. The fold created will be 45 degrees.
[edit 11 Apr 09: 45 degrees is not a magic number. You can use any angle. The angle changes how far in front of and behind the focus point the image appears out of focus. If the DoF is too small it may make it hard to count how far the lens is out of focus. You can change the viewing angle so the chart is closer to perpendicular (like a wall) so there are more numbers to count within the DoF. If the DoF is too large then the edge of focus may be beyond the scale of the chart. In this case adjust the viewing angle so it is closer to parallel (like the ground) and the numbers at the extreme ends of the chart will be more out of focus. For the most part though 45 degrees will work. I just wanted to point out that the angle used does not need to be exact and will have no bearing on the outcome other than changing the count of the numbers within the DoF.]
Don't fold your focus chart.
Put the focus chart on a flat surface.
The camera to focus chart distance will depend on the minimum focus distance of the lens you are testing. You will have to adjust the tripod height and/or place the chart at varying heights in order to be able to focus at the min focus distance. You will want to use the minimum distance as the depth of field is narrowest at that point and will show focus error better. Also use the widest aperture as this also narrows the depth of field. Leave a little room so the camera can focus a little in either direction of the correct focus so it can have the opportunity to create the focus error.
Never re-adjust the 45 degree angle during the test. Wrap something around the handle to remind you when you grab it. Use barbed wire if you have to, or jelly if your not into SM. If you are, then don't use barbed wire or you'll never complete the test.
Either move the tripod or the focus chart around in order to set the focus point on the mark. If you are testing a lens with a large focus distance then it will take some trial and error.
Tape the chart in place if it's prone to being moved accidentally.
Keep kids, dogs, cats, farm animals out of the testing area. This is a laboratory now and should be treated as one.
OK, now on to the meat.
1. Go into the AF Test Menu from the debug menu. It's at the bottom of the Setup Menu if the camera is in debug mode. If your camera is not in debug mode read this.
About the AF Test Areas. I'm not sure what area 0 really does, but I think nothing. Area 1 uses both a horizontal and a vertical focus pattern. So it does not matter what way the camera is rotated it will focus on the focus chart. Area 2 uses a Horizontal focus pattern. Area 3 uses a vertical focus pattern and you will have to rotate the camera 90 degrees in order for it to focus on the lines.
Note: If you adjust the value (say to +40) and hit OK, then the next time you adjust the value it will start counting at zero from that +40 point. So lets say we're going to go back to 0, it will read -40 when at the mark instead of 0. Also the increment steps are in 10.
2. Start with Focus Area 1. You select the focus areas with the left-right arrows on the 4-way controller.
To move between the focus area option and the adjustment amount use the up-down arrows on the 4-way controller.
4. Leave the focus adjustment at 0.
5. Press OK.
6. Manually defocus the lens.
7. Half press the shutter button a few times until the camera no longer tries to focus when you press the button. You should be focusing on the end of the text (the 'us') that reads "This text should be perfectly in focus".
8. Take a picture.
9. Go back in to the focus adjustment menu and select +40.
10. Manually defocus the lens again.
11. Half press the shutter several times until the camera doesn't try to focus anymore.
12. Take a picture.
13. Repeat steps 9-12 for a -40 adjustment. Remember you're going back -80 points to get to -40 from +40. Don't stop when it reads -40 or you will be back at 0 again.
14. Now load those 3 images into your photo editing software and view them at a magnification that you can clearly see the depth of field and where the front and rear out of focus areas.
From the images you can figure out which direction you need to correct, if any at all.
15. Repeat the focus correction procedure moving the focus point in the direction that continues to improve the focus until you have obtained the best focus.
Here are my results. Yours will differ so don't expect them to match.
I went into the AF Test menu and for all test areas, 1, 2, and 3, I set the focus to +40, 0, and -40 um. I did not see any difference in the outcome. So pick 1 or 3 and use the focus chart in vertical (as intended) direction and the camera in landscape.
I focused on the end of the text that reads "This line should be in perfect focus."
From looking at the different images I noticed that the -40um was the closest to being centered.
So I choose -50um as my correction and it seems bang on.
I should note that I tried math to figure out the correction value. I found 2 areas (one front and one back) that were equally out of focus. I subtracted the smaller value from the larger value and divided by 2 to get my correction value. However I had no way to equate my calculated value to the correction value in the camera. I though 10um meant 10 micro millimeters so when I calculated I had 6mm of front focus error I'm pretty close to my -50um correction value that I used. The problem with this method is with out more advanced scientific test equipment it's hard to get the exact numbers. I mean, we're using the human eye. Yes the eye is a great piece of test equipment, but the perception lacks. Just ask 10 different people to figure out your focus correction value and you'll get a dozen different answers.
I tried to use the spectral flux capacitor to help calculate the focus correction, but I think it needs an alignment itself. I never got a manual with it when I bought it off E-Bay, that's why the price was so good. Maybe some day when I want to kill some more cats I'll take it apart and fix it too.
Until then, enjoy your camera and stay away from all this extreme weather we're having.
Next we're going to prepare for session in the Pentax Wireless P-TTL flash system.
K10D debug mode with latest firmware (YEAH!)
I found this Firmware 1.3 debug unleashed.
[Edit - 15 July]English version of the software found here.
The original problem was that once you upgraded your firmware you lost the ability to do the key press combo to get into debug mode. Debug mode is used to test and adjust some internal settings in the camera like exposure and autofocus. It's a really handy mode to have access to and I don't understand why Pentax changed it.
This program allows us to add a debug mode to the camera's setup menu. It reprograms the menus via the USB cable. Pretty sweet.
The program is in Russian and I do not have the font installed so I see a bunch of ??????????s all over the place. I wouldn't understand Russian anyway even if I could read the font.
OK, after a little experimenting I've figured it out. More in the full post.
OK, here goes. Install the software (the installation is in English) by following the usual MS installation sequence.
1. Start the program. You can start the program before or after the USB connection and camera power on if you want.
2. Connect your Pentax K10D (or Samsung GX10) to the computer with the USB cable that came with your camera. You still have it, don't you?
3. Turn the camera on.
The program should match the image here. If not restart the program and the camera.
4. Press the connect button as shown.
If all went well you should end up matching the image here. If not then the computer is not connecting to the camera properly. Try restarting the camera, program, and reconnecting the USB cable. If none of that works, try MS' solution to everything, reboot the computer and try again.
5. If all is OK so far, select the bottom radio button (debug mode on).
6. Now press the conform button as shown.
7. Now press the OK button.
This will have no visible effect on the camera and the only way you know it may have worked is there are no error messages and the program should match this image.
At this point we want to disconnect the camera and exit the program.
8. Press the disconnect button.
9. Now press the exit button.
10. Turn off the camera and unplug the USB cable from the camera.
11. Turn the camera back on and after the initial display the screen will display Debug Mode in the upper left corner.
Congratulations, your camera is now in debug mode.
What I like about this debug mode over the 1.10 firmware version is, you can use the camera with no interference from the debug mode and there are no special key combos to get into debug mode.
If you want to see the options available in debug mode, press the menu button and scroll 2 to the right to the setup menu. Scroll up once (or down several times) and the debug menu will be visible. There are not as many selections to choose from as the 1.10 FW if I recall correctly, but this makes it easier to use.
Here are some shots to prove this actually works and shows what's available in the debug mode.
The capture/test mode I looked at and I'm not sure yet what it does. I'll experiment at a later date in case I want to kill the cat.
The AF Test is the one I'm really interested in. As soon as I figure out how to do a proper test and adjust I'll post it. I've included some shots of the AF Test menu options.
OK, so now you probably want to know how to get out of debug mode. It's simple as you can probably tell, but since I got you into this maze I'll lead you out.
Follow the steps to start the program and connect the camera as before up through step 4.
12. Select the Debug mode off button.
13. Press the Confirm button.
14. Press the disconnect button.
15. Now press the Exit button.
16. Turn off the camera and disconnect the USB cable from the camera.
When you turn the camera back on the debug mode will not display and the setup menu will be back to normal.
Well, that's all there is to the debug mode. Getting into and out of debug mode is pretty simple and if it wasn't for the program being written in another language this tutorial would not have been necessary.
Until next time, shot something, will ya?
[Edit - 15 July]English version of the software found here.
The original problem was that once you upgraded your firmware you lost the ability to do the key press combo to get into debug mode. Debug mode is used to test and adjust some internal settings in the camera like exposure and autofocus. It's a really handy mode to have access to and I don't understand why Pentax changed it.
This program allows us to add a debug mode to the camera's setup menu. It reprograms the menus via the USB cable. Pretty sweet.
The program is in Russian and I do not have the font installed so I see a bunch of ??????????s all over the place. I wouldn't understand Russian anyway even if I could read the font.
OK, after a little experimenting I've figured it out. More in the full post.
OK, here goes. Install the software (the installation is in English) by following the usual MS installation sequence.
1. Start the program. You can start the program before or after the USB connection and camera power on if you want.
2. Connect your Pentax K10D (or Samsung GX10) to the computer with the USB cable that came with your camera. You still have it, don't you?
3. Turn the camera on.
The program should match the image here. If not restart the program and the camera.
4. Press the connect button as shown.
If all went well you should end up matching the image here. If not then the computer is not connecting to the camera properly. Try restarting the camera, program, and reconnecting the USB cable. If none of that works, try MS' solution to everything, reboot the computer and try again.
5. If all is OK so far, select the bottom radio button (debug mode on).
6. Now press the conform button as shown.
7. Now press the OK button.
This will have no visible effect on the camera and the only way you know it may have worked is there are no error messages and the program should match this image.
At this point we want to disconnect the camera and exit the program.
8. Press the disconnect button.
9. Now press the exit button.
10. Turn off the camera and unplug the USB cable from the camera.
11. Turn the camera back on and after the initial display the screen will display Debug Mode in the upper left corner.
Congratulations, your camera is now in debug mode.
What I like about this debug mode over the 1.10 firmware version is, you can use the camera with no interference from the debug mode and there are no special key combos to get into debug mode.
If you want to see the options available in debug mode, press the menu button and scroll 2 to the right to the setup menu. Scroll up once (or down several times) and the debug menu will be visible. There are not as many selections to choose from as the 1.10 FW if I recall correctly, but this makes it easier to use.
Here are some shots to prove this actually works and shows what's available in the debug mode.
The capture/test mode I looked at and I'm not sure yet what it does. I'll experiment at a later date in case I want to kill the cat.
The AF Test is the one I'm really interested in. As soon as I figure out how to do a proper test and adjust I'll post it. I've included some shots of the AF Test menu options.
OK, so now you probably want to know how to get out of debug mode. It's simple as you can probably tell, but since I got you into this maze I'll lead you out.
Follow the steps to start the program and connect the camera as before up through step 4.
12. Select the Debug mode off button.
13. Press the Confirm button.
14. Press the disconnect button.
15. Now press the Exit button.
16. Turn off the camera and disconnect the USB cable from the camera.
When you turn the camera back on the debug mode will not display and the setup menu will be back to normal.
Well, that's all there is to the debug mode. Getting into and out of debug mode is pretty simple and if it wasn't for the program being written in another language this tutorial would not have been necessary.
Until next time, shot something, will ya?
Labels:
debug mode,
firmware,
K10D,
pentax,
version 1.3
Monday, June 23, 2008
K10D Manual White Balance
Like I promised back in the function menu post, here is the method and results of an in camera manual white balance setup.
I'll start with a caveat or 2 (or more).
The images of the K10D menu screens are taken with a Pentax DL and are not properly color corrected and are not near to life as they are not intended to be.
The final images from the in camera manual white balance are out of camera (OOC) (other than re-sizing) and still need post processing. I used jpg mode to record all images and no RAW files were used in the process.
This is not a post on how to color correct with post processing programs but intended to get the most accurate color correction straight out of camera.
You can use any (true) white sample you want for the manual white balance, just make sure it's really white.
Don't use an antique wedding dress as your sample as it most likely will be off-white and distort the color balance.
Moving on.
Start by selecting the manual white balance option from the function menu in record mode (not playback). The manual white balance is the second to last selection in the white balance menu. You should end up with a menu screen that looks like this.
Press the shutter button to take a sample photo.
You should now have a menu screen that looks like this.
You can size the selection box using the rear thumbwheel and move the selection box using the 4-way controller.
Move the selection box over the area in the sample image that contains the true white color.
Press the OK button.
You should now have a menu screen that looks like this. If you do not have a mixed lighting situation this may be all you need and can hit the OK button.
However, if you are in a mixed lighting situation then there is one final step to properly color correct the image.
Using the 4-way controller, move the cursor along the green-amber and blue-magenta grid until the white looks white. Slide over into the extremes a bit so you can see the changes and then move back until you don't see any of that color in the white any more. No, it's not an exact science at this point, and if you can't tell any difference in the color subtleties then leave the cursor at mid point and call it good.
You can do a final levels layer on your white color sample in post processing and use that layer to correct all images taken in the same lighting conditions.
My final manual white balance menu screen looked like this for the fluorescent/tungsten mix I had going on. YMMV. And remember, the menu screens are not color corrected so they do not look white.
Here is what the K10D saw with no color correction.
The BWG card.
The colorless subject.
And the final product straight OOC.
Well that's all there is to a K10D in camera manual white balance. Let me know if you have any questions by leaving a comment and I'll try to help.
Next article is on Debug Mode with the latest firmware.
I'll start with a caveat or 2 (or more).
The images of the K10D menu screens are taken with a Pentax DL and are not properly color corrected and are not near to life as they are not intended to be.
The final images from the in camera manual white balance are out of camera (OOC) (other than re-sizing) and still need post processing. I used jpg mode to record all images and no RAW files were used in the process.
This is not a post on how to color correct with post processing programs but intended to get the most accurate color correction straight out of camera.
You can use any (true) white sample you want for the manual white balance, just make sure it's really white.
Don't use an antique wedding dress as your sample as it most likely will be off-white and distort the color balance.
Moving on.
Start by selecting the manual white balance option from the function menu in record mode (not playback). The manual white balance is the second to last selection in the white balance menu. You should end up with a menu screen that looks like this.
Press the shutter button to take a sample photo.
You should now have a menu screen that looks like this.
You can size the selection box using the rear thumbwheel and move the selection box using the 4-way controller.
Move the selection box over the area in the sample image that contains the true white color.
Press the OK button.
You should now have a menu screen that looks like this. If you do not have a mixed lighting situation this may be all you need and can hit the OK button.
However, if you are in a mixed lighting situation then there is one final step to properly color correct the image.
Using the 4-way controller, move the cursor along the green-amber and blue-magenta grid until the white looks white. Slide over into the extremes a bit so you can see the changes and then move back until you don't see any of that color in the white any more. No, it's not an exact science at this point, and if you can't tell any difference in the color subtleties then leave the cursor at mid point and call it good.
You can do a final levels layer on your white color sample in post processing and use that layer to correct all images taken in the same lighting conditions.
My final manual white balance menu screen looked like this for the fluorescent/tungsten mix I had going on. YMMV. And remember, the menu screens are not color corrected so they do not look white.
Here is what the K10D saw with no color correction.
The BWG card.
The colorless subject.
And the final product straight OOC.
Well that's all there is to a K10D in camera manual white balance. Let me know if you have any questions by leaving a comment and I'll try to help.
Next article is on Debug Mode with the latest firmware.
Labels:
function menu,
K10D,
manual white balance,
pentax,
white balance
Thursday, June 19, 2008
The Function Menu (part 2)
Next we'll discuss the function menu in playback mode. To get to playback mode press the little arrow button near the bottom left of the back of the camera.
DPOF
DPOF is used to tag the photo with limited printing information. All you can tag is the number of copies you want printed and whether you want the date overlaid on the print or not. Use this feature if you take your SD card to the local photo lab and have your photos printed directly from the SD card.
If you want the same information on all images then press the function button again. To get out of all image mode, press the menu button near the upper left of the back of the camera.
Slideshow
Slideshow mode is used for just that, to start a slideshow of all the images stored in the camera. Once you select slideshow from the main function menu the slideshow starts after a really quick display of the slideshow menu. The OK button pauses and restarts the slideshow while the left and right arrows display the previous and next images respectively. The down arrow stops the slideshow and you have to go back into the function menu to start the slideshow again. Pretty simple stuff.
File Conversion
File conversion is used to convert a RAW image into a jpg image. If a jpg image is displayed in playback then you can not select the file conversion option. Once in the file conversion option you can use the left and right arrows to select the previous and next images.
Once you have selected the desired image to convert press the OK button. This will bring you to the jpg settings menu.
In the jpg settings menu you can change all the information like you can from the record menu. Once you change the settings you want press the OK button. If you want to exit the jpg settings menu press the menu button.
If you want to change one of the settings press the function button again. You will be prompted to save the image as a new file. Select Save as and press the OK button to start the actual conversion/save process. The jpg image will now be stored on the SD card.
Digital Filters
Digital filters basically are an in camera digital photo editing software. They are limited in what they can do but in a pinch can produce usable results.
The B&W filter can do a basic color to black and white conversion or you can select either the red, green, or blue color channels using the rear thumbwheel to be converted to black and white.
The sepia filter allows you to select 3 levels of sepia toning.
The color filter allows you to tint the image with 6 colors. You select the color with the front wheel and select the amount with the rear wheel.
The soft filter applies a blur to the image to create a creamy finish. Again there are 3 levels to choose from.
The slim filter stretches either the horizontal or the vertical size of the image to produce either a slimming or fattening effect. Unless you're going for that carnival fun house mirror effect, don't stretch either of the axis too far.
The brightness filter allows you to adjust the brightness of the image in 8 steps in either direction.
Here's a trick to combine more than one filter to an image. Select one filter and save the new image. Then select the new image and add another filter to it.
By creating a black and white image as the first image and then adding a color tint to it you can create toned black and white images in a color other than sepia.
And you can even add multiple color filters to get secondary color tints or select opposite colors and convert the image back to black and white.
Well I hope you enjoyed our little tour of the function menu in playback mode.
Next I will dig into white balance and how to do a manual white balance in camera.
DPOF
DPOF is used to tag the photo with limited printing information. All you can tag is the number of copies you want printed and whether you want the date overlaid on the print or not. Use this feature if you take your SD card to the local photo lab and have your photos printed directly from the SD card.
If you want the same information on all images then press the function button again. To get out of all image mode, press the menu button near the upper left of the back of the camera.
Slideshow
Slideshow mode is used for just that, to start a slideshow of all the images stored in the camera. Once you select slideshow from the main function menu the slideshow starts after a really quick display of the slideshow menu. The OK button pauses and restarts the slideshow while the left and right arrows display the previous and next images respectively. The down arrow stops the slideshow and you have to go back into the function menu to start the slideshow again. Pretty simple stuff.
File Conversion
File conversion is used to convert a RAW image into a jpg image. If a jpg image is displayed in playback then you can not select the file conversion option. Once in the file conversion option you can use the left and right arrows to select the previous and next images.
Once you have selected the desired image to convert press the OK button. This will bring you to the jpg settings menu.
In the jpg settings menu you can change all the information like you can from the record menu. Once you change the settings you want press the OK button. If you want to exit the jpg settings menu press the menu button.
If you want to change one of the settings press the function button again. You will be prompted to save the image as a new file. Select Save as and press the OK button to start the actual conversion/save process. The jpg image will now be stored on the SD card.
Digital Filters
Digital filters basically are an in camera digital photo editing software. They are limited in what they can do but in a pinch can produce usable results.
The B&W filter can do a basic color to black and white conversion or you can select either the red, green, or blue color channels using the rear thumbwheel to be converted to black and white.
The sepia filter allows you to select 3 levels of sepia toning.
The color filter allows you to tint the image with 6 colors. You select the color with the front wheel and select the amount with the rear wheel.
The soft filter applies a blur to the image to create a creamy finish. Again there are 3 levels to choose from.
The slim filter stretches either the horizontal or the vertical size of the image to produce either a slimming or fattening effect. Unless you're going for that carnival fun house mirror effect, don't stretch either of the axis too far.
The brightness filter allows you to adjust the brightness of the image in 8 steps in either direction.
Here's a trick to combine more than one filter to an image. Select one filter and save the new image. Then select the new image and add another filter to it.
By creating a black and white image as the first image and then adding a color tint to it you can create toned black and white images in a color other than sepia.
And you can even add multiple color filters to get secondary color tints or select opposite colors and convert the image back to black and white.
Well I hope you enjoyed our little tour of the function menu in playback mode.
Next I will dig into white balance and how to do a manual white balance in camera.
Labels:
function menu,
K10D,
pentax
Monday, June 16, 2008
Back at it! Function Menu (part 1)
After a long absence I'm back and we take up where we left of with the menus, in particular the Function menu.
The Function Menu
We'll take the function menu in clockwise order starting with the camera in record mode (not playback).
Drive mode
The drive mode lets you change how the camera will capture each frame. You can decide between single frame, continuous shooting, 2 timed delay modes, and 2 remote control modes.
Single frame shooting is just that. For every press of the shutter button you capture one image. This is your basic default mode for normal shooting.
Continuous shooting will continue to capture images as long as you have the shutter button pressed. This mode is useful to capture sports action and multi frame shots of a sequence of events. It's not quite fast enough to capture a golf swing in motion or anything like that, but fine for a soccer game. If you need to capture frames of a golf swing or other such fast action try one frame and a strobe that fires repeatedly.
The first self-timer mode is a 12 second delay which is used mostly when the photographer wants to be in the image but doesn't have a remote shutter device. Once you press the shutter button the camera will start beeping and flashing and you have 12 seconds before the curtain releases. 10 seconds into the sequence the beeping and flashing speed up to indicate the release time is close. This gives you 2 seconds to get those pearly whites showing.
The second timer mode locks the mirror assembly in the up position and waits 2 seconds for any vibrations to settle before releasing the curtain. This mode is used mainly in macro or astro photography. It can be used in any condition where camera vibration is causing the image to be blurry.
The first remote control mode is the default Infra-Red (IR) remote mode where the shutter curtain releases when the remote button is pressed. I have not yet used an IR remote so I can't elaborate any more on it. As with all IR devices I'm sure there are line of sight issues as well as distance (power) issues with the remote's LED.
The second remote control mode also adds a 3 second delay. The manual does not mention if the mirror locks up in this mode, but I imagine it does or else why have such a short delay.
ISO (Sensitivity)
AUTO Sensitivity is a very useful mode especially when you dial in your top and bottom ISO numbers. What will happen then is the camera will try to use the lowest ISO possible to properly expose an image based on what the aperture and shutter speed is. If the available light is not enough then the camera will up the ISO to obtain proper exposure. The max and min settings can be adjusted via the front and rear dials. The front dial adjusts the min setting while the rear dial adjusts the max setting. I keep mine on AUTO 100-400 when I'm shooting Av or Tv priority modes. This lets me select the speed or aperture I want and the camera will adjust the sensitivity to compensate. ISO 400 still delivers very clean images (low digital noise).
You can also select a static ISO by pressing the 4-way controller up or down until the desired ISO is displayed. The ISO step increment can be adjusted in the Custom Setting menu (Sensitivity Steps) to 1 EV steps or to match the EV steps. I have mine set to match the EV steps as I can really fine tune the sensitivity if I need to when in manual mode to get the desired exposure.
I don't recommend using ISO above 800 as there is very visible digital noise in the shadow/dark areas of the image. I have used 800 when it was necessary with usable results but 1600 has too much noise.
Flash mode
The flash mode lets you set how you want the flash to operate. In this instance we're only going to discuss the settings for the built in flash and not talk about external (hot-shoe mounted flashes), however, some of these settings work with an external flash also.
The first setting is the basic default flash on mode. If the pop-up flash is up then the flash will fire when the image is captured.
Flash on plus Red Eye reduction will fire a few pre flashes to help constrict the pupils so the amount of reflected light is reduced and so is the red eye.
Slow speed sync is used when shooting in dim lighting conditions where you want the subject to be lit by the flash yet the shutter speed is slow enough to capture the dark background. This is useful in a dimly lit room where you want some of the background to be visible instead of black or when shooting portraits against a sunset. A tripod is most useful in these conditions.
Slow speed sync plus red eye is the last two modes combined.
Trailing curtain sync is used for moving subjects where you want the trail of the subject to be behind the flash lit subject. What happens in normal flash mode, the flash is fired right after the first curtain begins to move and if the rear curtain is too far behind due to a long shutter speed then the moving subject will be recorded after the flash lit subject. This gives the impression the subject is moving backwards. To give the illusion that the subject is moving forwards the flash is fired right before the rear curtain begins to close so the flash lit subject is recorded after the subject trail is recorded. This sounds confusing and I suppose it is a little. I'll elaborate more when we discuss flash technology, but for now just know to shoot moving subjects in dim conditions with long shutter speeds the rear curtain sync is the mode to use.
Wireless mode allows the camera's built in flash to remote fire slave flashes. This mode will only be visible if you have the latest firmware version installed. We will discuss this mode in detail when we discuss flash technology.
The read thumbwheel allows you to adjust the flash compensation from -2.0 to +1.0 in 0.5 increments. If you find your flash is too bright or to dim in certain conditions you can manually adjust the compensation to obtain a properly exposed image.
White Balance
The white balance settings for the most part are quite straight forward with the exception of the Color Temperature and the Manual modes being more complicated.
Lets talk a little bit about color temperature because if we don't you will get pretty confused when I say that cloudy or shade lighting conditions have a higher temperature than full sunlight.
Here's why. Color temperature ranges from the lowest (reds) to the hottest (blues) when we're talking about color temperature. It seems backwards to what we humans have been taught over the years. So in terms of photography I'll only discuss the temperatures of the lighting conditions we're most likely to shoot in and that is tungsten lighting through shade (red through blue). Also along with color temperature is the hue of the color. The temperature follows the red-blue scale while the hue follows the green-magenta scale. Think of this like a square grid where you can adjust both sets of numbers to dial in the correct balance.
Tungsten has a temperature of about 2800K (varies with different bulbs) which is quite red in color.
Sunlight (at noon) is about 5200K and has less red than tungsten. Sunlight in the morning and evening has more of a red temperature.
Cloudy conditions produce about 6000K while shade produces about 8000K. These numbers will vary slightly depending on the amount of mixed light (reflected sunlight, thin clouds etc.) but for the most part in full cloud or full shade the numbers work.
Fluorescent lighting has a temperature of about 4000K but can have a very green hue to it. It's the one light source that makes mixed lighting difficult to capture properly. For beginners try to avoid mixed lighting with tungsten. If you can turn off the other light source and just use one even if it's fluorescent.
OK, now that we've discussed color temperature a little lets move on the camera settings.
Auto White balance is useful under most lighting conditions from 4000K (fluorescent lighting) to 8000K (shade). So it's useful for most lighting conditions except tungsten. If you’re using hot lights with a color temperature under 4000K then you will want to set your white balance to compensate.
Daylight white balance is great for shooting outdoors in direct sunlight. You’re not going to see much difference between Auto and Daylight settings when the subject is lit by direct sun.
Shade is used when shooting in the shade of a large object where there is little reflected sunlight from nearby objects. The more reflected sunlight then the redder the image will be. This is OK though as we'll discuss in a bit the camera is quite capable to adjust to these conditions.
Cloudy is used when shooting in the open (no shade) under cloudy skies. The color temperature will vary depending on the depth of the cloud cover. Again the camera settings can be fine tuned to produce the desired results.
The fluorescent setting has 3 settings that can be selected. This is for daylight balanced bulbs, neutral bulbs, and white bulbs. If you know the color of your fluorescent bulbs then select the one that matches. If not, then stay tuned for the Manual setting coming up in a bit.
The tungsten setting is used when shooting under hot lights or a bare tungsten bulb or even candle light.
Flash setting is used when shooting with a flash whether it's the pop up flash or an external flash. Pentax flashes produce about the same color.
The manual setting allows you to take a sample frame and select an area of that frame to set to white. We'll discuss this in detail in a moment.
The color temperature setting allows you to manually dial in and store up to 3 different color temps/ hue variations. This is useful if you use certain locations often for photo shoots and want to recall the proper white balance. Maybe you have one favorite location but want to have a daylight and a cloudy setting for it. The choice is up to you to decide what to store.
That's the function menu in record mode. Next we'll take a look at the function menu in playback mode.
The Function Menu
We'll take the function menu in clockwise order starting with the camera in record mode (not playback).
Drive mode
The drive mode lets you change how the camera will capture each frame. You can decide between single frame, continuous shooting, 2 timed delay modes, and 2 remote control modes.
Single frame shooting is just that. For every press of the shutter button you capture one image. This is your basic default mode for normal shooting.
Continuous shooting will continue to capture images as long as you have the shutter button pressed. This mode is useful to capture sports action and multi frame shots of a sequence of events. It's not quite fast enough to capture a golf swing in motion or anything like that, but fine for a soccer game. If you need to capture frames of a golf swing or other such fast action try one frame and a strobe that fires repeatedly.
The first self-timer mode is a 12 second delay which is used mostly when the photographer wants to be in the image but doesn't have a remote shutter device. Once you press the shutter button the camera will start beeping and flashing and you have 12 seconds before the curtain releases. 10 seconds into the sequence the beeping and flashing speed up to indicate the release time is close. This gives you 2 seconds to get those pearly whites showing.
The second timer mode locks the mirror assembly in the up position and waits 2 seconds for any vibrations to settle before releasing the curtain. This mode is used mainly in macro or astro photography. It can be used in any condition where camera vibration is causing the image to be blurry.
The first remote control mode is the default Infra-Red (IR) remote mode where the shutter curtain releases when the remote button is pressed. I have not yet used an IR remote so I can't elaborate any more on it. As with all IR devices I'm sure there are line of sight issues as well as distance (power) issues with the remote's LED.
The second remote control mode also adds a 3 second delay. The manual does not mention if the mirror locks up in this mode, but I imagine it does or else why have such a short delay.
ISO (Sensitivity)
AUTO Sensitivity is a very useful mode especially when you dial in your top and bottom ISO numbers. What will happen then is the camera will try to use the lowest ISO possible to properly expose an image based on what the aperture and shutter speed is. If the available light is not enough then the camera will up the ISO to obtain proper exposure. The max and min settings can be adjusted via the front and rear dials. The front dial adjusts the min setting while the rear dial adjusts the max setting. I keep mine on AUTO 100-400 when I'm shooting Av or Tv priority modes. This lets me select the speed or aperture I want and the camera will adjust the sensitivity to compensate. ISO 400 still delivers very clean images (low digital noise).
You can also select a static ISO by pressing the 4-way controller up or down until the desired ISO is displayed. The ISO step increment can be adjusted in the Custom Setting menu (Sensitivity Steps) to 1 EV steps or to match the EV steps. I have mine set to match the EV steps as I can really fine tune the sensitivity if I need to when in manual mode to get the desired exposure.
I don't recommend using ISO above 800 as there is very visible digital noise in the shadow/dark areas of the image. I have used 800 when it was necessary with usable results but 1600 has too much noise.
Flash mode
The flash mode lets you set how you want the flash to operate. In this instance we're only going to discuss the settings for the built in flash and not talk about external (hot-shoe mounted flashes), however, some of these settings work with an external flash also.
The first setting is the basic default flash on mode. If the pop-up flash is up then the flash will fire when the image is captured.
Flash on plus Red Eye reduction will fire a few pre flashes to help constrict the pupils so the amount of reflected light is reduced and so is the red eye.
Slow speed sync is used when shooting in dim lighting conditions where you want the subject to be lit by the flash yet the shutter speed is slow enough to capture the dark background. This is useful in a dimly lit room where you want some of the background to be visible instead of black or when shooting portraits against a sunset. A tripod is most useful in these conditions.
Slow speed sync plus red eye is the last two modes combined.
Trailing curtain sync is used for moving subjects where you want the trail of the subject to be behind the flash lit subject. What happens in normal flash mode, the flash is fired right after the first curtain begins to move and if the rear curtain is too far behind due to a long shutter speed then the moving subject will be recorded after the flash lit subject. This gives the impression the subject is moving backwards. To give the illusion that the subject is moving forwards the flash is fired right before the rear curtain begins to close so the flash lit subject is recorded after the subject trail is recorded. This sounds confusing and I suppose it is a little. I'll elaborate more when we discuss flash technology, but for now just know to shoot moving subjects in dim conditions with long shutter speeds the rear curtain sync is the mode to use.
Wireless mode allows the camera's built in flash to remote fire slave flashes. This mode will only be visible if you have the latest firmware version installed. We will discuss this mode in detail when we discuss flash technology.
The read thumbwheel allows you to adjust the flash compensation from -2.0 to +1.0 in 0.5 increments. If you find your flash is too bright or to dim in certain conditions you can manually adjust the compensation to obtain a properly exposed image.
White Balance
The white balance settings for the most part are quite straight forward with the exception of the Color Temperature and the Manual modes being more complicated.
Lets talk a little bit about color temperature because if we don't you will get pretty confused when I say that cloudy or shade lighting conditions have a higher temperature than full sunlight.
Here's why. Color temperature ranges from the lowest (reds) to the hottest (blues) when we're talking about color temperature. It seems backwards to what we humans have been taught over the years. So in terms of photography I'll only discuss the temperatures of the lighting conditions we're most likely to shoot in and that is tungsten lighting through shade (red through blue). Also along with color temperature is the hue of the color. The temperature follows the red-blue scale while the hue follows the green-magenta scale. Think of this like a square grid where you can adjust both sets of numbers to dial in the correct balance.
Tungsten has a temperature of about 2800K (varies with different bulbs) which is quite red in color.
Sunlight (at noon) is about 5200K and has less red than tungsten. Sunlight in the morning and evening has more of a red temperature.
Cloudy conditions produce about 6000K while shade produces about 8000K. These numbers will vary slightly depending on the amount of mixed light (reflected sunlight, thin clouds etc.) but for the most part in full cloud or full shade the numbers work.
Fluorescent lighting has a temperature of about 4000K but can have a very green hue to it. It's the one light source that makes mixed lighting difficult to capture properly. For beginners try to avoid mixed lighting with tungsten. If you can turn off the other light source and just use one even if it's fluorescent.
OK, now that we've discussed color temperature a little lets move on the camera settings.
Auto White balance is useful under most lighting conditions from 4000K (fluorescent lighting) to 8000K (shade). So it's useful for most lighting conditions except tungsten. If you’re using hot lights with a color temperature under 4000K then you will want to set your white balance to compensate.
Daylight white balance is great for shooting outdoors in direct sunlight. You’re not going to see much difference between Auto and Daylight settings when the subject is lit by direct sun.
Shade is used when shooting in the shade of a large object where there is little reflected sunlight from nearby objects. The more reflected sunlight then the redder the image will be. This is OK though as we'll discuss in a bit the camera is quite capable to adjust to these conditions.
Cloudy is used when shooting in the open (no shade) under cloudy skies. The color temperature will vary depending on the depth of the cloud cover. Again the camera settings can be fine tuned to produce the desired results.
The fluorescent setting has 3 settings that can be selected. This is for daylight balanced bulbs, neutral bulbs, and white bulbs. If you know the color of your fluorescent bulbs then select the one that matches. If not, then stay tuned for the Manual setting coming up in a bit.
The tungsten setting is used when shooting under hot lights or a bare tungsten bulb or even candle light.
Flash setting is used when shooting with a flash whether it's the pop up flash or an external flash. Pentax flashes produce about the same color.
The manual setting allows you to take a sample frame and select an area of that frame to set to white. We'll discuss this in detail in a moment.
The color temperature setting allows you to manually dial in and store up to 3 different color temps/ hue variations. This is useful if you use certain locations often for photo shoots and want to recall the proper white balance. Maybe you have one favorite location but want to have a daylight and a cloudy setting for it. The choice is up to you to decide what to store.
That's the function menu in record mode. Next we'll take a look at the function menu in playback mode.
Labels:
function menu,
K10D,
pentax
Subscribe to:
Posts (Atom)