

I'll start with a caveat or 2 (or more).
The images of the K10D menu screens are taken with a Pentax DL and are not properly color corrected and are not near to life as they are not intended to be.
The final images from the in camera manual white balance are out of camera (OOC) (other than re-sizing) and still need post processing. I used jpg mode to record all images and no RAW files were used in the process.
This is not a post on how to color correct with post processing programs but intended to get the most accurate color correction straight out of camera.
You can use any (true) white sample you want for the manual white balance, just make sure it's really white.
Don't use an antique wedding dress as your sample as it most likely will be off-white and distort the color balance.
Moving on.
Press the shutter button to take a sample photo.
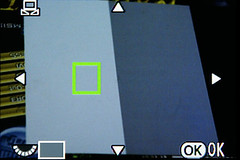
You can size the selection box using the rear thumbwheel and move the selection box using the 4-way controller.
Move the selection box over the area in the sample image that contains the true white color.
Press the OK button.
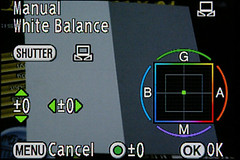
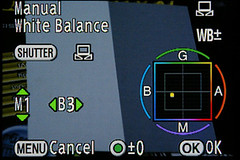
However, if you are in a mixed lighting situation then there is one final step to properly color correct the image.
Using the 4-way controller, move the cursor along the green-amber and blue-magenta grid until the white looks white. Slide over into the extremes a bit so you can see the changes and then move back until you don't see any of that color in the white any more. No, it's not an exact science at this point, and if you can't tell any difference in the color subtleties then leave the cursor at mid point and call it good.
You can do a final levels layer on your white color sample in post processing and use that layer to correct all images taken in the same lighting conditions.

The BWG card.


And the final product straight OOC.
Well that's all there is to a K10D in camera manual white balance. Let me know if you have any questions by leaving a comment and I'll try to help.
Next article is on Debug Mode with the latest firmware.
No comments:
Post a Comment