
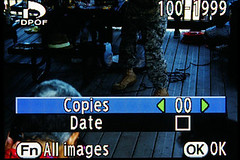
DPOF
DPOF is used to tag the photo with limited printing information. All you can tag is the number of copies you want printed and whether you want the date overlaid on the print or not. Use this feature if you take your SD card to the local photo lab and have your photos printed directly from the SD card.
If you want the same information on all images then press the function button again. To get out of all image mode, press the menu button near the upper left of the back of the camera.
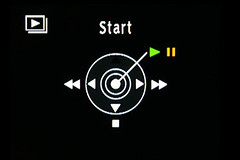
Slideshow mode is used for just that, to start a slideshow of all the images stored in the camera. Once you select slideshow from the main function menu the slideshow starts after a really quick display of the slideshow menu. The OK button pauses and restarts the slideshow while the left and right arrows display the previous and next images respectively. The down arrow stops the slideshow and you have to go back into the function menu to start the slideshow again. Pretty simple stuff.

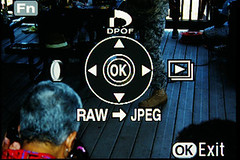
File conversion is used to convert a RAW image into a jpg image. If a jpg image is displayed in playback then you can not select the file conversion option. Once in the file conversion option you can use the left and right arrows to select the previous and next images.
Once you have selected the desired image to convert press the OK button. This will bring you to the jpg settings menu.
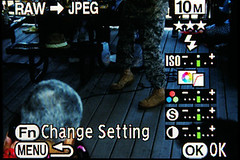
If you want to change one of the settings press the function button again. You will be prompted to save the image as a new file. Select Save as and press the OK button to start the actual conversion/save process. The jpg image will now be stored on the SD card.
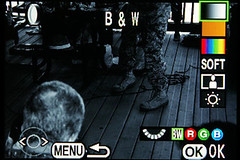
Digital filters basically are an in camera digital photo editing software. They are limited in what they can do but in a pinch can produce usable results.
The B&W filter can do a basic color to black and white conversion or you can select either the red, green, or blue color channels using the rear thumbwheel to be converted to black and white.
The sepia filter allows you to select 3 levels of sepia toning.
The color filter allows you to tint the image with 6 colors. You select the color with the front wheel and select the amount with the rear wheel.
The soft filter applies a blur to the image to create a creamy finish. Again there are 3 levels to choose from.
The slim filter stretches either the horizontal or the vertical size of the image to produce either a slimming or fattening effect. Unless you're going for that carnival fun house mirror effect, don't stretch either of the axis too far.
The brightness filter allows you to adjust the brightness of the image in 8 steps in either direction.
Here's a trick to combine more than one filter to an image. Select one filter and save the new image. Then select the new image and add another filter to it.
By creating a black and white image as the first image and then adding a color tint to it you can create toned black and white images in a color other than sepia.
And you can even add multiple color filters to get secondary color tints or select opposite colors and convert the image back to black and white.
Well I hope you enjoyed our little tour of the function menu in playback mode.
Next I will dig into white balance and how to do a manual white balance in camera.
No comments:
Post a Comment