
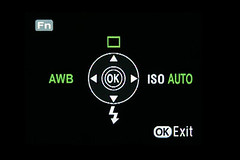
The Function Menu
We'll take the function menu in clockwise order starting with the camera in record mode (not playback).
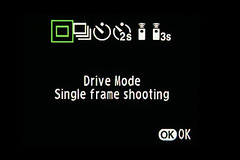
The drive mode lets you change how the camera will capture each frame. You can decide between single frame, continuous shooting, 2 timed delay modes, and 2 remote control modes.
Single frame shooting is just that. For every press of the shutter button you capture one image. This is your basic default mode for normal shooting.
Continuous shooting will continue to capture images as long as you have the shutter button pressed. This mode is useful to capture sports action and multi frame shots of a sequence of events. It's not quite fast enough to capture a golf swing in motion or anything like that, but fine for a soccer game. If you need to capture frames of a golf swing or other such fast action try one frame and a strobe that fires repeatedly.
The first self-timer mode is a 12 second delay which is used mostly when the photographer wants to be in the image but doesn't have a remote shutter device. Once you press the shutter button the camera will start beeping and flashing and you have 12 seconds before the curtain releases. 10 seconds into the sequence the beeping and flashing speed up to indicate the release time is close. This gives you 2 seconds to get those pearly whites showing.
The second timer mode locks the mirror assembly in the up position and waits 2 seconds for any vibrations to settle before releasing the curtain. This mode is used mainly in macro or astro photography. It can be used in any condition where camera vibration is causing the image to be blurry.
The first remote control mode is the default Infra-Red (IR) remote mode where the shutter curtain releases when the remote button is pressed. I have not yet used an IR remote so I can't elaborate any more on it. As with all IR devices I'm sure there are line of sight issues as well as distance (power) issues with the remote's LED.
The second remote control mode also adds a 3 second delay. The manual does not mention if the mirror locks up in this mode, but I imagine it does or else why have such a short delay.

AUTO Sensitivity is a very useful mode especially when you dial in your top and bottom ISO numbers. What will happen then is the camera will try to use the lowest ISO possible to properly expose an image based on what the aperture and shutter speed is. If the available light is not enough then the camera will up the ISO to obtain proper exposure. The max and min settings can be adjusted via the front and rear dials. The front dial adjusts the min setting while the rear dial adjusts the max setting. I keep mine on AUTO 100-400 when I'm shooting Av or Tv priority modes. This lets me select the speed or aperture I want and the camera will adjust the sensitivity to compensate. ISO 400 still delivers very clean images (low digital noise).
You can also select a static ISO by pressing the 4-way controller up or down until the desired ISO is displayed. The ISO step increment can be adjusted in the Custom Setting menu (Sensitivity Steps) to 1 EV steps or to match the EV steps. I have mine set to match the EV steps as I can really fine tune the sensitivity if I need to when in manual mode to get the desired exposure.
I don't recommend using ISO above 800 as there is very visible digital noise in the shadow/dark areas of the image. I have used 800 when it was necessary with usable results but 1600 has too much noise.
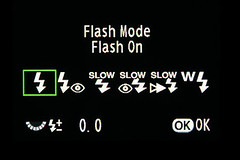
The flash mode lets you set how you want the flash to operate. In this instance we're only going to discuss the settings for the built in flash and not talk about external (hot-shoe mounted flashes), however, some of these settings work with an external flash also.
The first setting is the basic default flash on mode. If the pop-up flash is up then the flash will fire when the image is captured.
Flash on plus Red Eye reduction will fire a few pre flashes to help constrict the pupils so the amount of reflected light is reduced and so is the red eye.
Slow speed sync is used when shooting in dim lighting conditions where you want the subject to be lit by the flash yet the shutter speed is slow enough to capture the dark background. This is useful in a dimly lit room where you want some of the background to be visible instead of black or when shooting portraits against a sunset. A tripod is most useful in these conditions.
Slow speed sync plus red eye is the last two modes combined.
Trailing curtain sync is used for moving subjects where you want the trail of the subject to be behind the flash lit subject. What happens in normal flash mode, the flash is fired right after the first curtain begins to move and if the rear curtain is too far behind due to a long shutter speed then the moving subject will be recorded after the flash lit subject. This gives the impression the subject is moving backwards. To give the illusion that the subject is moving forwards the flash is fired right before the rear curtain begins to close so the flash lit subject is recorded after the subject trail is recorded. This sounds confusing and I suppose it is a little. I'll elaborate more when we discuss flash technology, but for now just know to shoot moving subjects in dim conditions with long shutter speeds the rear curtain sync is the mode to use.
Wireless mode allows the camera's built in flash to remote fire slave flashes. This mode will only be visible if you have the latest firmware version installed. We will discuss this mode in detail when we discuss flash technology.
The read thumbwheel allows you to adjust the flash compensation from -2.0 to +1.0 in 0.5 increments. If you find your flash is too bright or to dim in certain conditions you can manually adjust the compensation to obtain a properly exposed image.

The white balance settings for the most part are quite straight forward with the exception of the Color Temperature and the Manual modes being more complicated.
Lets talk a little bit about color temperature because if we don't you will get pretty confused when I say that cloudy or shade lighting conditions have a higher temperature than full sunlight.
Here's why. Color temperature ranges from the lowest (reds) to the hottest (blues) when we're talking about color temperature. It seems backwards to what we humans have been taught over the years. So in terms of photography I'll only discuss the temperatures of the lighting conditions we're most likely to shoot in and that is tungsten lighting through shade (red through blue). Also along with color temperature is the hue of the color. The temperature follows the red-blue scale while the hue follows the green-magenta scale. Think of this like a square grid where you can adjust both sets of numbers to dial in the correct balance.
Tungsten has a temperature of about 2800K (varies with different bulbs) which is quite red in color.
Sunlight (at noon) is about 5200K and has less red than tungsten. Sunlight in the morning and evening has more of a red temperature.
Cloudy conditions produce about 6000K while shade produces about 8000K. These numbers will vary slightly depending on the amount of mixed light (reflected sunlight, thin clouds etc.) but for the most part in full cloud or full shade the numbers work.
Fluorescent lighting has a temperature of about 4000K but can have a very green hue to it. It's the one light source that makes mixed lighting difficult to capture properly. For beginners try to avoid mixed lighting with tungsten. If you can turn off the other light source and just use one even if it's fluorescent.
OK, now that we've discussed color temperature a little lets move on the camera settings.
Auto White balance is useful under most lighting conditions from 4000K (fluorescent lighting) to 8000K (shade). So it's useful for most lighting conditions except tungsten. If you’re using hot lights with a color temperature under 4000K then you will want to set your white balance to compensate.
Daylight white balance is great for shooting outdoors in direct sunlight. You’re not going to see much difference between Auto and Daylight settings when the subject is lit by direct sun.
Shade is used when shooting in the shade of a large object where there is little reflected sunlight from nearby objects. The more reflected sunlight then the redder the image will be. This is OK though as we'll discuss in a bit the camera is quite capable to adjust to these conditions.
Cloudy is used when shooting in the open (no shade) under cloudy skies. The color temperature will vary depending on the depth of the cloud cover. Again the camera settings can be fine tuned to produce the desired results.
The fluorescent setting has 3 settings that can be selected. This is for daylight balanced bulbs, neutral bulbs, and white bulbs. If you know the color of your fluorescent bulbs then select the one that matches. If not, then stay tuned for the Manual setting coming up in a bit.
The tungsten setting is used when shooting under hot lights or a bare tungsten bulb or even candle light.
Flash setting is used when shooting with a flash whether it's the pop up flash or an external flash. Pentax flashes produce about the same color.
The manual setting allows you to take a sample frame and select an area of that frame to set to white. We'll discuss this in detail in a moment.
The color temperature setting allows you to manually dial in and store up to 3 different color temps/ hue variations. This is useful if you use certain locations often for photo shoots and want to recall the proper white balance. Maybe you have one favorite location but want to have a daylight and a cloudy setting for it. The choice is up to you to decide what to store.
That's the function menu in record mode. Next we'll take a look at the function menu in playback mode.
3 comments:
Nice!
Pentax should have you write their manuals.
Thanks for the kind comment!
That motivated me to get the photos added. :)
Greaat reading your post
Post a Comment