
I did all the experiments and adjustments earlier and took photos of the procedure.
(edit 18 Ssep 2010 - Pentax Focus Chart)
INGREDIENTS
- Tripod
- Low Flat surface (the floor is fine if U have a good back)
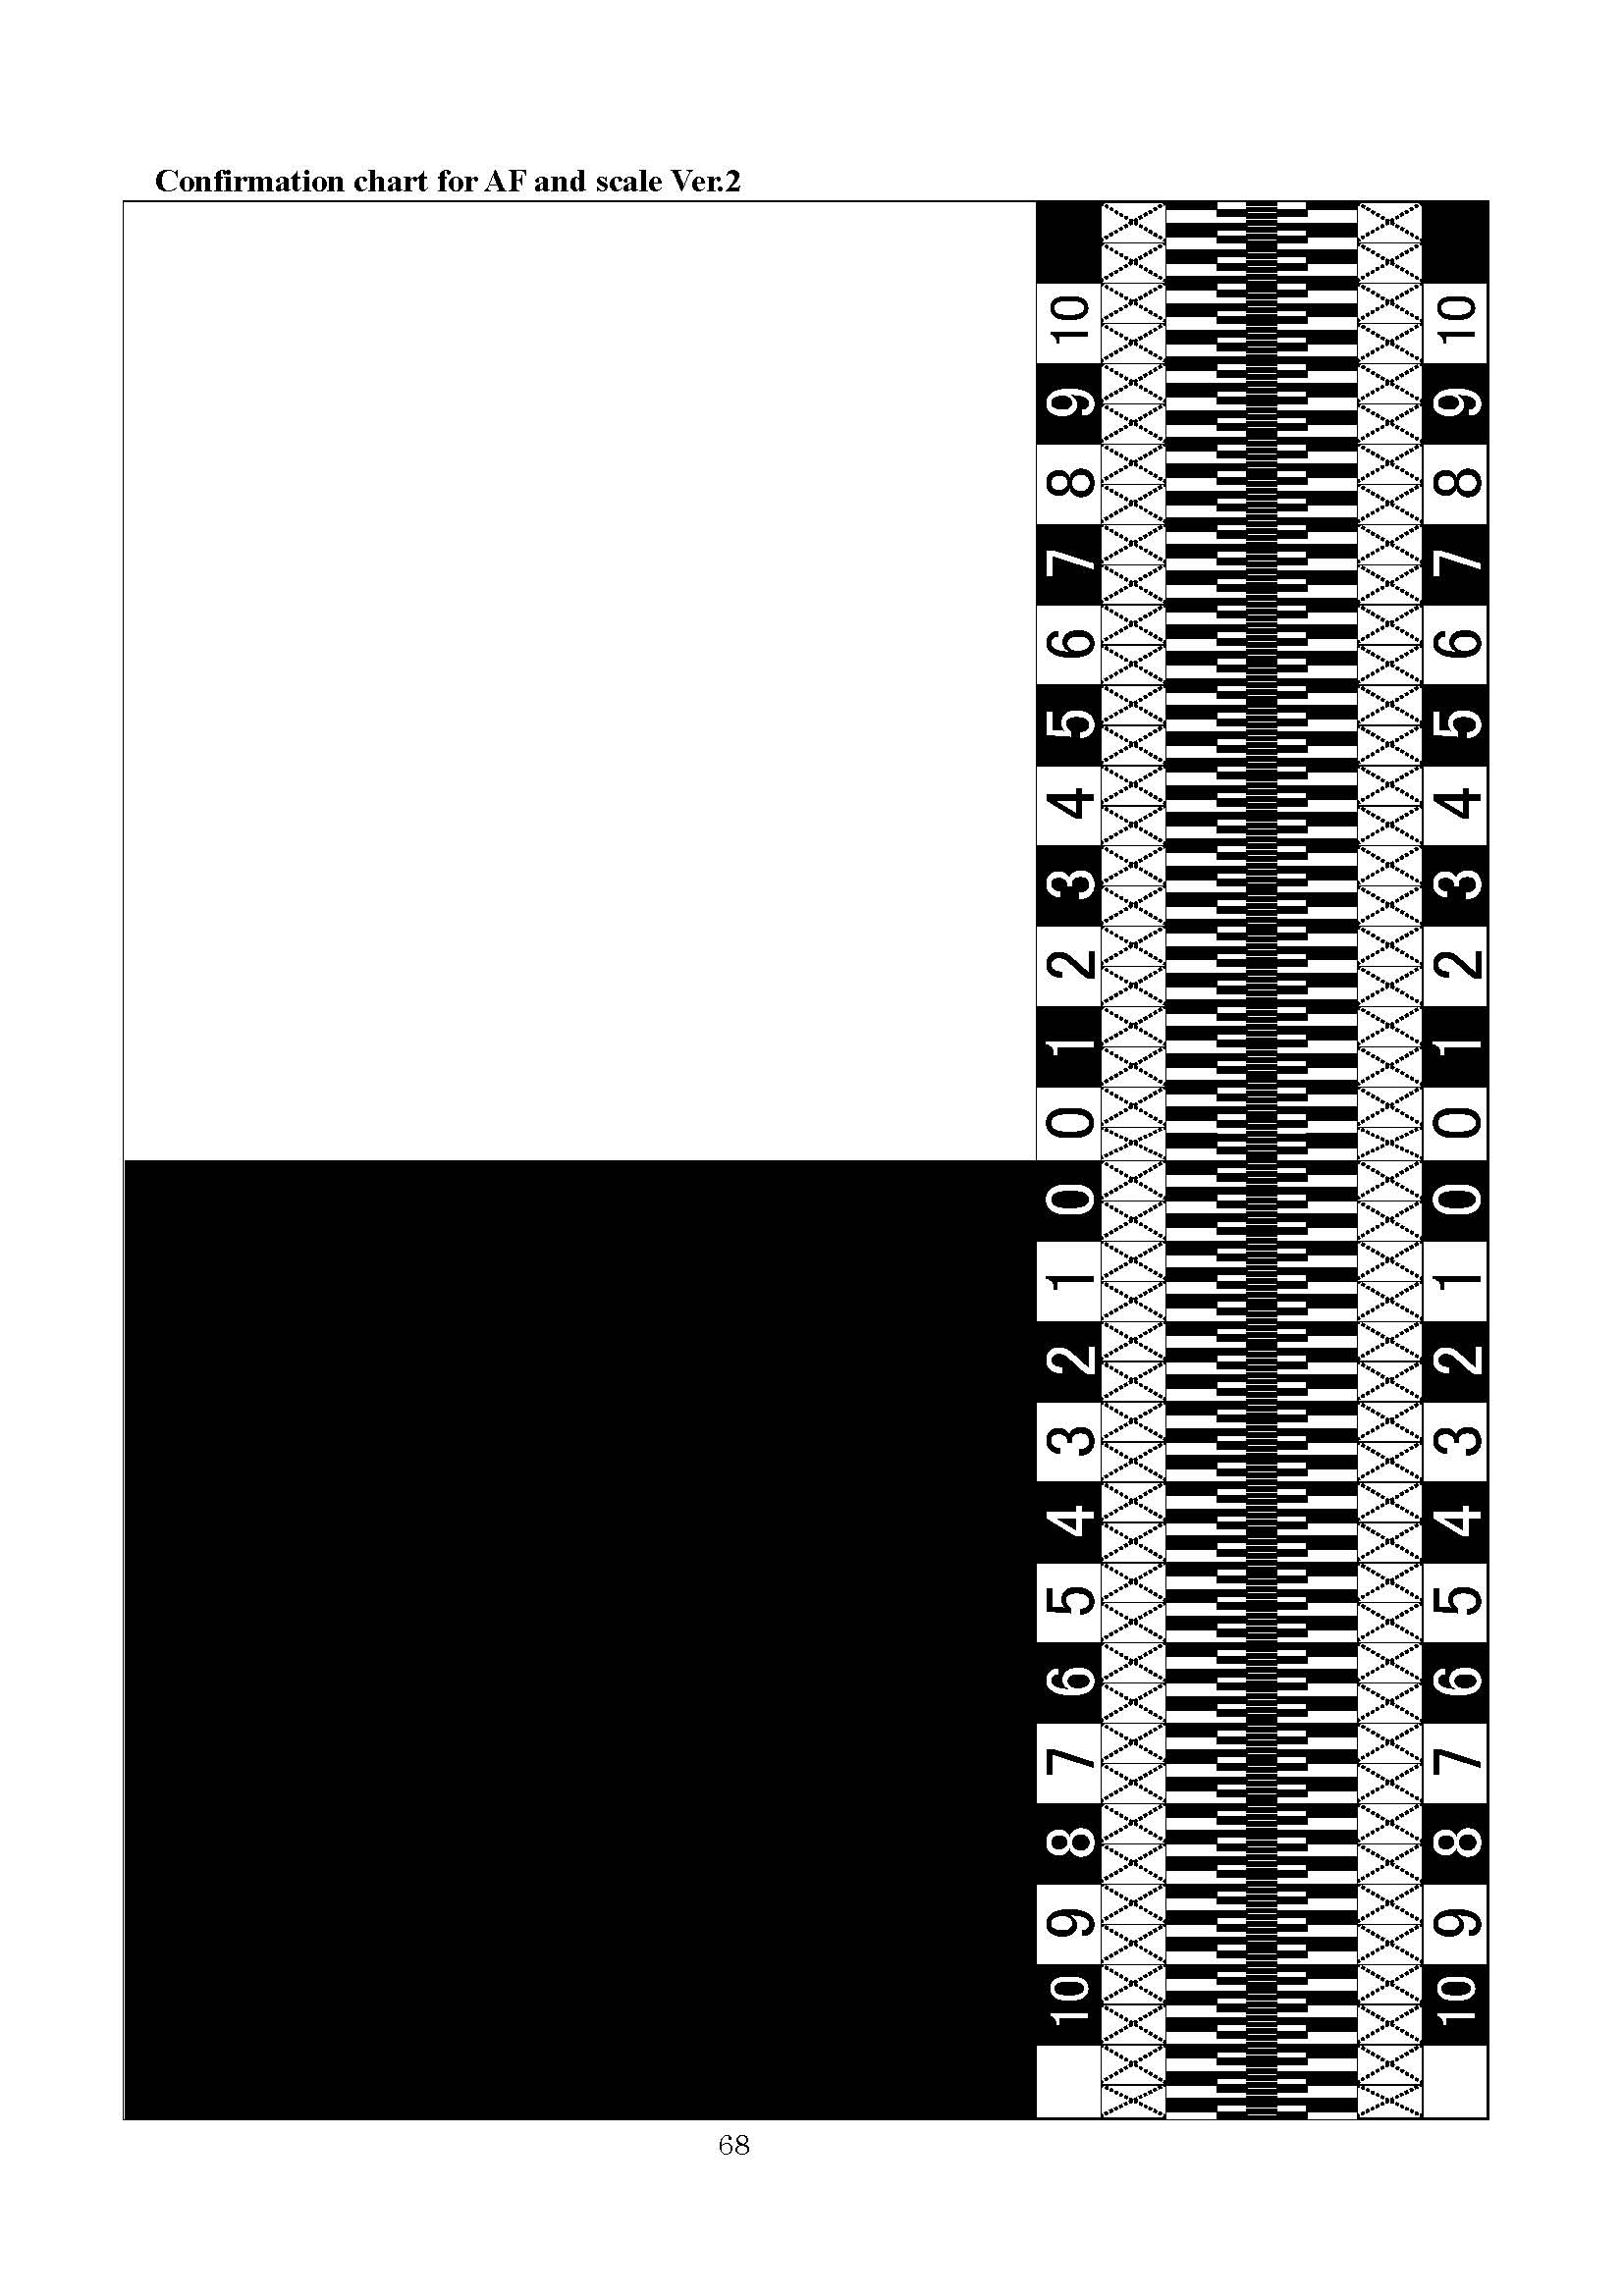
- Focus chart (you can find one here)
- The lens you want to test and or correct for
-Writing paper
- Pen or Pencil
- Spectral Flux Capacitor (optional, but I had one lying around)
Pre set up
Put the camera on the tripod and set the angle to 45 degrees looking down. If you don't have a way to measure 45 degrees, remember your geometry. Any square object has a 45 degree line if you draw one from one corner to the opposite corner. Fold a piece of paper so when folded from a corner the top aligns flush with the side. The fold created will be 45 degrees.
[edit 11 Apr 09: 45 degrees is not a magic number. You can use any angle. The angle changes how far in front of and behind the focus point the image appears out of focus. If the DoF is too small it may make it hard to count how far the lens is out of focus. You can change the viewing angle so the chart is closer to perpendicular (like a wall) so there are more numbers to count within the DoF. If the DoF is too large then the edge of focus may be beyond the scale of the chart. In this case adjust the viewing angle so it is closer to parallel (like the ground) and the numbers at the extreme ends of the chart will be more out of focus. For the most part though 45 degrees will work. I just wanted to point out that the angle used does not need to be exact and will have no bearing on the outcome other than changing the count of the numbers within the DoF.]
Don't fold your focus chart.
Put the focus chart on a flat surface.
The camera to focus chart distance will depend on the minimum focus distance of the lens you are testing. You will have to adjust the tripod height and/or place the chart at varying heights in order to be able to focus at the min focus distance. You will want to use the minimum distance as the depth of field is narrowest at that point and will show focus error better. Also use the widest aperture as this also narrows the depth of field. Leave a little room so the camera can focus a little in either direction of the correct focus so it can have the opportunity to create the focus error.
Never re-adjust the 45 degree angle during the test. Wrap something around the handle to remind you when you grab it. Use barbed wire if you have to, or jelly if your not into SM. If you are, then don't use barbed wire or you'll never complete the test.
Either move the tripod or the focus chart around in order to set the focus point on the mark. If you are testing a lens with a large focus distance then it will take some trial and error.
Tape the chart in place if it's prone to being moved accidentally.
Keep kids, dogs, cats, farm animals out of the testing area. This is a laboratory now and should be treated as one.
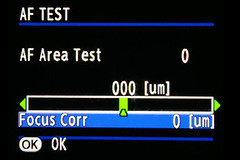
1. Go into the AF Test Menu from the debug menu. It's at the bottom of the Setup Menu if the camera is in debug mode. If your camera is not in debug mode read this.
About the AF Test Areas. I'm not sure what area 0 really does, but I think nothing. Area 1 uses both a horizontal and a vertical focus pattern. So it does not matter what way the camera is rotated it will focus on the focus chart. Area 2 uses a Horizontal focus pattern. Area 3 uses a vertical focus pattern and you will have to rotate the camera 90 degrees in order for it to focus on the lines.
Note: If you adjust the value (say to +40) and hit OK, then the next time you adjust the value it will start counting at zero from that +40 point. So lets say we're going to go back to 0, it will read -40 when at the mark instead of 0. Also the increment steps are in 10.
2. Start with Focus Area 1. You select the focus areas with the left-right arrows on the 4-way controller.
To move between the focus area option and the adjustment amount use the up-down arrows on the 4-way controller.
4. Leave the focus adjustment at 0.
5. Press OK.
6. Manually defocus the lens.
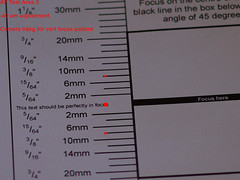
7. Half press the shutter button a few times until the camera no longer tries to focus when you press the button. You should be focusing on the end of the text (the 'us') that reads "This text should be perfectly in focus".
8. Take a picture.
9. Go back in to the focus adjustment menu and select +40.
10. Manually defocus the lens again.
11. Half press the shutter several times until the camera doesn't try to focus anymore.
12. Take a picture.
13. Repeat steps 9-12 for a -40 adjustment. Remember you're going back -80 points to get to -40 from +40. Don't stop when it reads -40 or you will be back at 0 again.
14. Now load those 3 images into your photo editing software and view them at a magnification that you can clearly see the depth of field and where the front and rear out of focus areas.
From the images you can figure out which direction you need to correct, if any at all.
15. Repeat the focus correction procedure moving the focus point in the direction that continues to improve the focus until you have obtained the best focus.

+40um correction
I went into the AF Test menu and for all test areas, 1, 2, and 3, I set the focus to +40, 0, and -40 um. I did not see any difference in the outcome. So pick 1 or 3 and use the focus chart in vertical (as intended) direction and the camera in landscape.
I focused on the end of the text that reads "This line should be in perfect focus."

0um correction
-40um correction
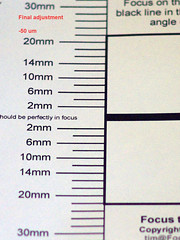
So I choose -50um as my correction and it seems bang on.
I should note that I tried math to figure out the correction value. I found 2 areas (one front and one back) that were equally out of focus. I subtracted the smaller value from the larger value and divided by 2 to get my correction value. However I had no way to equate my calculated value to the correction value in the camera. I though 10um meant 10 micro millimeters so when I calculated I had 6mm of front focus error I'm pretty close to my -50um correction value that I used. The problem with this method is with out more advanced scientific test equipment it's hard to get the exact numbers. I mean, we're using the human eye. Yes the eye is a great piece of test equipment, but the perception lacks. Just ask 10 different people to figure out your focus correction value and you'll get a dozen different answers.
I tried to use the spectral flux capacitor to help calculate the focus correction, but I think it needs an alignment itself. I never got a manual with it when I bought it off E-Bay, that's why the price was so good. Maybe some day when I want to kill some more cats I'll take it apart and fix it too.
Until then, enjoy your camera and stay away from all this extreme weather we're having.
Next we're going to prepare for session in the Pentax Wireless P-TTL flash system.
27 comments:
Hi, I've followed you post for AF adjusting my pentax. I've also find on : http://www.rarwebworks.com/Photography/Pentax.htm
That area correspond to the AF focusing point quoted text :
"
The upper highlighted area is called AF Area Test, and has a default value of 0. Just leave it there (there are 4 options here that select which auto-fucus sensors are used for the test).
"
Thanks for your post !
Benoit
can you explain why I have to defocus lens?
ebst regards
If you are referring to step 6 then the purpose of the defocus step is to make sure the focus system tries to focus. If the lens is already in focus as might be the case when you are aligning the focus chart under the lens, then you have to defocus so the camera actually moves the focus system so it can be tested for errors.
I hope this makes sense.
If I have not answered your question then please ask again.
Thanks.
I love your blog. Just found this article and have been trying to adjust my K10D with the 16-50 2.8 DA* lens.
I found that at 50 mm zoom, a -20 correction was best. But at 28 mm zoom, it takes a +40. -20 has terrible back-focus. This is all at f2.8.
Any idea what would cause this? Do I have a bad lens, or is this typical?
thanks
Hi Ned, sorry I took so long to get back to you.
With a zoom lens, Pentax recommends performing the test at the longest focal length of the lens.
The longer end shows a narrower DoF therefore the error is more noticeable. Then when zoomed out to the shortest length it should work also.
If it doesn't then yes, you may have a bum lens.
Thanks for the guide, I followed it to fix a back focusing issue on my new DA* 50-135. Cheers.
Hi, am about to try and fix the 17-70 f/4.....before I do, the question is....
Will the new settings apply only to that one lens, or across anything I put there?. my other lenses seem fine, just the 17-70 (more at the 17mm end)....
Thanks.
Michele
I am not 100% sure on that, but I believe the K10D only has one memory spot that holds the focus adjustment. The debug program does not show any information on different memory locations.
If you are sure it is only one lens with focus issues then I'd say the lens had the problem and not the camera.
Usually if the camera has the focus issues it will show up more on the long lenses and less on the short lenses. It's just not so noticeable on the short lenses because of the larger DoF.
If your long lenses look fine then I'd say it was the actual lens with the problems.
You can always try the adjustment. It's not permanent. If it messes the other lenses up then set it back to where it was and try to return the bad lens.
Hope this helped.
thanks a lot for your feedback. Will have to figure out what to do...difficult for me to return the lens....may try and send it across to Pentax italy...
Ciao
Mik
Hello. I think I may use your tutorial for a FA 50/1.4.
One question appears important to me: as the value set by the previous adjustment is the zero for the next one, it is pretty easy do get lost... ;)
If I flash back the original 1.3 firmware, do I get all values reseted to factory defaults, or isn't the setting memory affected by the firmware flash?
Thanks...
While I have never reverted a firmware to a previous version, I would suspect that all stored values would be over written, but in truth I have no idea.
Sorry I can't answer your question.
No trouble...
I've just tested, and it seems to work fine...
The only annoying thing is this with "debug mode" label when you look in the camera... ;)
I set -20µm for my 50mm f/1.4. If I disable debug mode with the small tool you linked to, will the -20µm be kept?
Yes, any values you entered in the camera in debug mode will be kept. So if you're comfortable with the focus correction then by all means set the camera back to normal menu.
I have had back focus problems with my K10D for a while, but only when I shoot people, not fixed objects, and I did a shoot over the weekend and every single photo was out of focus (not blurry, just OOF--the tree was sharp, the model's eyes were not). I used three different lenses throughout the shoot: the FA 43, the DA 40 and the DA 17-70. Is this a problem with my camera, or all three lenses? (Back-Focusing rarely happens on my Sigma 70-300).
Also, does this correction work differently for my two screw-drive focusing lenses and my SDM 17-70 used? Have you found any more information on the adjustments saved to a specific set of lenses, or would I have to adjust every lens I mount to my camera individually? If so, I'll probably see if Pentax will repair the issue. Thanks for any help.
Derek,
Do you have any samples anywhere that we can look at?
From your description it's hard to tell what the problem could be but most likely is with the camera.
From my experience it's easy to tell the eyes are soft when not properly focused yet hard to tell if a tree is soft. The tree has to be OOF more to see any blur.
I have no idea what experience level you are in photography so don't take offense here but this happens more than people like to admit. When shooting closeups of faces with large apertures and long focal lengths make sure you are focusing on the eyes and not the nose or ears. It makes a big difference.
The SDM lenses I have no experience with so I am not sure how the adjustment would work for a SDM lens. I'd assume it works the same way just the focus motor is housed in the lens rather than in the camera. The focus sensors are the same for each type of lens.
The focus adjustment is in camera so it will affect all screw focus lenses the same way assuming they have no errors themselves. Assuming all lenses are 100% then the in camera adjustment will be the same on all screw focus lenses.
Remember longer focal lengths show more error than short focal lengths. So yo may not notice a focus error below a certain focal length in your camera but if there is one I assure you the error is there in the short lengths it's just the greater DoF helps hide it.
Hope this answers your questions.
You won't break anything by adjusting focus error as you can set the camera back to where it was and no harm done so try it out.
Hi, thanks for the post. Just a quick comment. When I reset my value to +30, switched off debug, disconnected, tried the camera and reconnected, re-enabled debug the camera stilled showed a value of +30, not the 0 I was expecting from your explanation.
What version of Firmware are you running?
I'll check this out and get back to you.
@ Alan and Lyn: My camera does the same thing. Many K10Ds show the last adjustment. It's not much different from the explanation, as the author explained the adjustment is stored, so you'd have to compensate for it. Luckily, your camera also displays the stored adjustment so you don't have to remember it.
@ Photography Rulez: Sorry for the delay in my response. No, I don't have any examples online. I had minor back focus, and an adjustment of 40 helped with that. My last shoot went fairly well, but I manually focused 95% of the shots, and about 90% of them were properly focused. I may still send the camera in to Pentax to be adjusted and calibrated with my lenses, as I don't want to have to deal with this problem again.
AlanandLyn,
The text in the post is correct. There are two numbers, one above the adjustment bar and one below the adjustment bar on the right side. The one above the bar shows the current adjustment stored in the camera. The one below/right is the compensation value that you are about to dial in.
What I was saying in the post text is in order to get the +40 stored value back to 0 your have to dial in -40. The value below the bar is not what the final stored number will be it's how much it will be adjusted by. If you left it at zero thinking it would set the stored value to zero, then the stored value would actually not change any.
I hope this makes sense.
Thanks for stopping by and asking the question. I'm glad people are getting use out of this post.
Hello,
I have updated from 1.0 to 1.31
how can I revert to 1.10 firmware so that I can get rid of the focus/sharpness issue in my K10D Pentax??? thanks a lot for your help, this has been a pain so far..
Maya
Maja,
I don't quite understand your question.
Reverting firmware will not fix focusing errors unless you are trying to remove the corrections you made to your camera.
I have never reverted the firmware and cannot be sure it will remove any changes you made to focus adjustment.
However this link may answer your question.
http://ricehigh.blogspot.com/2007/09/how-to-get-back-to-older-version-of.html
I was AF Testing on my DA* 16-50 F2.8 SDM with K10D, firmware v1.31.00.19
When it was zoomed all the way in, the correction was +200um.
When it was zoomed out, the correction was (about) +40um.
Has anyone else got a similar experience with DA* lenses?
I can switch on/off debug mode whenever I turn the camera on by having some text files on the SD card. So, AF TEST menu is easily accessible all the time.
Anthony
Thank goodness for finding your site. My K10 has taken a lot of punishment and I assumed this was the reason for out of focus pics. Have a correction of -110. Seems to work ok with three lenses - manual and auto. But seems like a huge correction. Curious is anybody else has had such a large correction?
Thanks a lot for this site ! I had a pretty huge back focus issue and managed to correct it with a +240 setting. It's even a bigger correction than bleatinglamb's !
Since I only have one lens, it's pretty hard to tell if it's coming from the K10 or the lens though.
Do you know what kind of correction one usually makes ?
Thanks
This may not be correct "and divided by 2 to get my correction ". The depth in front and behind the actual focal plane is not symmetrical. Whether or not its significant you might want to do a quick calculation here (http://www.dofmaster.com/dofjs.html) with your exact test set-up parameters to get it perfect.
@Anonymous1: From reading the comments most adjustments are from 20 to 40. A few are in the hundreds.
@Anonymous2: Yeah, I didn't hold much faith in the calculation myself and didn't use it, just trial and error to get my final adjustment value. Thanks for the DOF link. I'll look into that when I have time.
hey if you have a hardware problem like I did and manual focus also will not work (images are back-focused even when sharp through viewfinder): http://www.pentax-hack.info/documents/downloads.html has factory repair manual! it has instructions for manually adjusting screw to fix this. very simple, tools required are a jewelers screwdriler and a small ball-end allen wrench (I used a 1.5mm which was slightly too small but worked OK) as well as a ruler at 45 degrees. Note: This worked for me but I have no idea whether this is advisable.
Post a Comment