
First off, Happy Thanksgiving. I hope you're enjoying food and family and giving thanks for all things in your lives.
To our troops overseas, I wish you a speedy and safe return. Having been separated over the holidays myself I know how it feels.
I was going to start off by diving into the Mode Dial, but a lot of what happens in the different modes really depends on how the camera is setup. So in order for us all to be on the same page when talking about a certain mode we need to understand the settings and what they do. If we understand the settings then when our final images differ we will understand why.
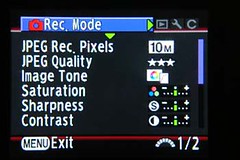
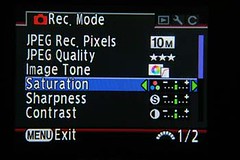
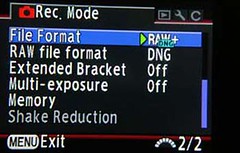
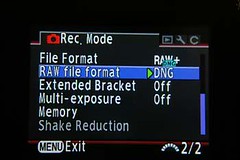
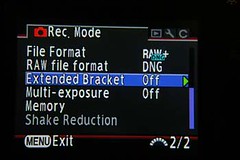
Lets start with the Record Mode Settings Menu. It is the first menu that pops up when we hit the menu button.
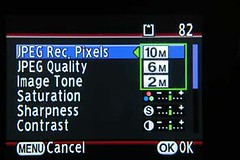
The K10D has three JPEG pixel settings, 10MP, 6MP, and 2MP. The image resolutions for each are as follows.
10MP: Image Width = 3872 pixels
Image Height = 2592 pixels
File size is around 2Mb
6MP: Image Width = 3008 pixels
Image Height = 2000 pixels
File size is around 1Mb
2MP: Image Width = 1824 pixels
Image Height = 1216 pixels
File size is around 500Kb
What this setting really affects is the maximum size of a print. For example in 10MP mode Photoshop says at 300dpi your print size will be about 12.9 inches by 8.6 inches. If you set the dpi to 250 you can get a print size of about 15.5 inches by 10.4 inches. At 6MP the print sizes will be about 10 by 6.7 at 300dpi and at 2MP they are about 6 by 4.
This only affects the JPEG image and does not change the image size of a RAW image. If you shoot in RAW only mode then this setting does nothing.
I leave mine on 10MP as I don't ever want to forget that it is set lower when I am trying to get the largest image size possible. I shoot mostly in RAW mode or RAW+ unless I am photographing a large event where there will be many photos where I need the memory card space or won't have time to post process the RAW images.
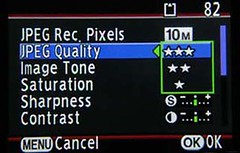
The K10D has 3 JPEG quality settings, high, medium and low as depicted by the number of stars. I found at 10MP there is not much of a file size difference between high and medium quality. Low quality is about half the file size as the high quality. I didn't test at 6MP or 2MP but the findings should be similar. I do know you can fit a hell-of-a-lot-a 2MP low quality images on a 2 Gig SD card. My image counter reads 5235 on a freshly formatted card.
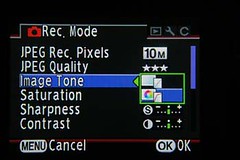
The image tone setting is used to boost brightness/contrast/saturation in a JPEG image. The default of flat leaves the JPEG in a condition that needs to be adjusted outside the camera in a graphics editor. If you want to print good looking JPEG images from the camera you will need to set this to bright and even boost more the saturation/sharpness/contrast with the three setting below. If you prefer to post process your images then leave this flat or shoot in RAW mode for even greater control over how the final image looks.
The 3 settings, saturation, sharpness, and contrast, adjust how much of each are in the final JPG image. Slide to the right for more and slide to the left for less of each. Looking at the image on the camera's LCD screen you will not notice any difference. But there is a big difference when viewing the images in your graphics program. If you do your own post processing on JPEG images then leave these in the middle. Again these settings have no affect on RAW images.
With the file format setting you can choose between shooting only JPEG, only RAW, or RAW plus JPG. Choosing this setting will depend on how you process your final images. If you want to quickly send some JPEGs or print them then then select JPEG. If you want to process RAW image files then choose RAW. If you need to do both then choose RAW plus JPEG.
RAW file format lets you choose what RAW file format you want. If you use a graphics program that does not support Pentax's RAW format (PEF) then use Adobe's open format (DNG). I have found most modern graphics programs (GIMP with DCRAW), Photoshop, Pentax's own imaging program (SILKYPIX) can read both formats. I haven't figured out which is best to use myself for which application so some more experimentation is needed. From what I have seen so far though is there is little difference to my workflow no matter which RAW mode I choose.
Now this is something I find intriguing, Extended Bracket. Most of you know what exposure bracketing is, where you take multiple frames of the same subject with different exposure values. Now what extended bracketing does is allow us to do the same for white balance, saturation, sharpness and contrast. If you are shooting JPEG mode and don't want to post process your images you can use this bracketing method to figure out (a lot quicker) what settings will make your JPEGs look good. Once you figure out where each setting should be then program them permanently and turn off extended bracketing. This is a lot faster as it allows you to take bracketed photos without having to enter the menu each time to adjust the setting.
This again is only useful in JPEG mode and in fact once you enable extended bracketing your file format changes to JPEG. So use it to set your saturation/sharpness/contrast and then turn it off.
In white balance extended bracket mode the white balance can be bracketed by +1, +2, or +3 in the green/magenta or blue/amber ranges.
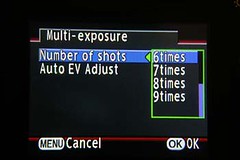
Multiple Exposure mode gives the digital camera a familiar old film mode where you expose the same frame multiple times. You can expose up to 9 images on the same frame in camera. There is an auto exposure adjustment if you want the camera to automatically compensate for over exposure, or if you are a pro at multiple exposures and know how to get the results you want then turn it off. What is nice about digital is you get to see the result immediately following the set number of exposures. If the image is not quite right then shoot the scenes again. I can see applications where one can do 'grunge' and/or 'ghost' images in camera.
There are several applications where this mode can be useful, one being astrophotography and the other where you want a long exposure but the conditions are too bright and you don't have a ND filter. Astrophotography could benefit by the in camera stacking of long exposures. This will bring out more detail in deep space objects such as nebulae. You will want to use an equatorial mount for this though. The other use is when you are trying to take a long exposure of a water fall (or similar moving object) in bright daylight with out an ND filter. The resulting multiple exposure will show the moving parts as blurred yet the EV compensation will keep the exposure within range.
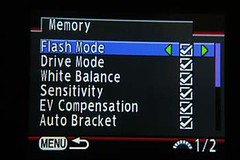
The memory setting lets you select what you want saved when the camera is turned off.
This could be useful if you are experimenting with different setting but don't want to save them. Just turn them all off and go experiment. If you really screw up the settings you can of course hit the reset option in the respective menu.
A note straight out of the manual (pg 200) says the file no. when turned on will save the current image number and all images thereafter will be sequential even if you swap memory cards. If it is turned off it will use the last image number found on the current memory card.
Also a new folder is created when the current image count is over 500 (except bracketed images which are kept together).
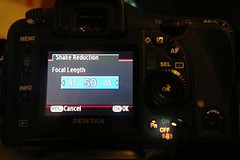
The shake reduction setting is defaulted out when you have an automatic lens attached that communicates its focal length to the camera. When a manual lens is attached that won't communicate the focal length the camera will ask for the focal length each time you turn the camera on. You can manually adjust this after the fact from this menu setting. Just scroll with the controller to the desired focal length.
You have to have the shake reduction switch turned on for the camera to ask for the focal length when it is turned on.
This concludes all the settings in the record mode menu.
Next Article
No comments:
Post a Comment