
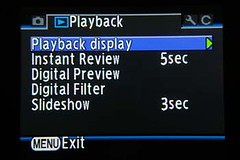
This is a short little menu but it does have some useful features that I use.
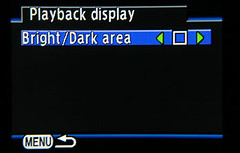
This setting changes whether you want under or over exposed areas to flash on the display screen during playback. I usually leave this setting turned off on the playback screen so I don't get distracted by it while examining the picture.
This is where I turn on the histogram and bright/dark area settings. I set the time to 5 seconds which is enough time to check the exposure to make sure the settings are correct. I can do it in 3 seconds but what the heck, I'm in no hurry. Also you don't have to wait for the display to turn off before taking the next photo, just half press the shutter button and the screen is turned off right away.
I turn the instant review off during astrophotography as it messes with my night vision. You can dim the display as we will discuss in the set-up menu.
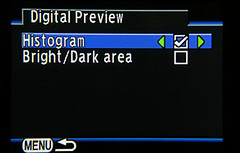
The K10D has a feature called digital preview. Prior camera models had optical preview where you saw the image result only in the viewfinder. With digital preview the camera actually shoots the frame and shows the result on the playback LCD screen but does not store the image to disk. Preview is used to check things like depth of field exposure settings and composition.
I'm a bit confused why you would need a digital preview on a digital camera, I mean, just take a photo, check it in playback and if it's a keeper then you're good. If not just delete it (or not) and take another. Keep at it till you get it right. Once you get a keeper, protect the image so you can perform a delete all later if your card gets full. What would annoy me is if the preview was a keeper since it can not be saved. Maybe we can request this in a later version of firmware.
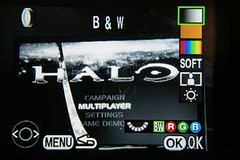
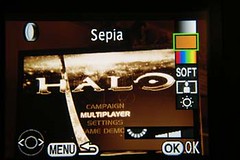
Digital filters are built-in post processing functions that perform black and white conversions, sepia toning, color tinting, softening, slimming, and brightness adjustment. These features are useful if you print from camera. If you don't then use a graphics editing program where you have more control over the process.
The black and white filter converts the color image to grayscale. You can use the rear thumbwheel to choose to convert all 3 color channels evenly or you can convert each color channel independently. You can not however mix your own levels of each color channel. That would be a nice feature for a later firmware upgrade.
However in the color tinting section I will show you how you can create black and white images with varying tones.
Sepia toning gives that old timey feeling to a photo. The rear thumbwheel controls how rich the sepia toning will be.
Not much more to say about that filter.
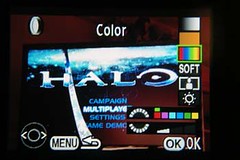
Color tinting is way more useful than one would think. With a little experimenting you can create some tinted color images, color tinted greyscale images, and greyscale conversions that have subtle variances in tone.
You can color tint any image, be it color or greyscale. Use the front thumbwheel to select which color tint you want to use and use the rear thumbwheel to select the amount of color from subtle to vibrant in 3 concise steps. :)
You can save each filtered image and add additional filters to it to create mid-tones and mid-tints.
To create 2 greyscale images with different tones, first create a greyscale using all 3 channels. Save it. Preview the new image and color tint it red. Save it. Preview the new image and color tint it cyan. This turns the image back to greyscale.
Now repeat the same process on the original black and white image and use magenta and green as the 2 colors.
Now compare the 2 converted images in playback by quickly switching between them and you will see the subtle differences. You can create other tinted black and white images by using different colors other than the complimentary secondary colors and fine tuning can be tweaked by adjusting the amount of the filter with the rear thumbwheel.
The soft filter creates a soft image by blurring the image slightly. The amount of the blur can be adjusted by the rear thumbwheel. You can blur a previously tinted image for an in-camera artistic image.
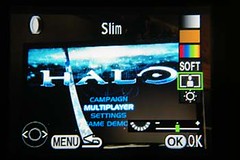
The slim filter is used to increase the vertical to horizontal pixel ratio. You can increase either the vertical or horizontal axis to make the image appear slimmer or fatter. Turn the rear thumbwheel to the positive and the image appears thinner and turn the thumbwheel to the minus and the image appears fatter.
Me personally I do not like the results on people, but you may.
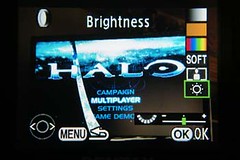
The brightness filter adjusts the overall brightness of the photo. Turn the rear thumbwheel to the plus and the image will get brighter and vice versa.
Don't forget to hit OK to save any of these filter effects.
The slideshow feature is used to display an in camera or on a monitor via the PC/Video cable.
You can select the interval to be 3, 5, 10, or 15 seconds. The repeat playback setting puts the slideshow in a continuous loop.
This is nice if you have spent all day photographing a group event and what to show the images at a gathering afterwards. Weddings, regattas, sports/field day all come to mind.
Don't forget to pack your PC/Video cable in your camera bag before you leave for the event.
And that rounds out the Playback menu.
Next Article


No comments:
Post a Comment