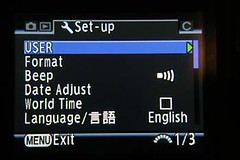
The setup menu contains the basic camera preferences that really don't affect the images.
This is where you set the camera up for the first time when you purchase it. You set the language, date, time, whether and on what feature the camera beeps, the brightness of the display (useful at night), video out (NTSC for USA and PAL for most other countries), transfer mode (how files are transfered off the camera), auto power off timer, folder naming conventions, battery selector, cleaning functions, and the setup reset function.
The USER function saves the current camera settings in camera memory. Unfortunately there is only one memory space available. To be really useful there needs to be several memory spaces. Then you could save your favorite settings for different shooting modes like portrait, landscape, or macro. This would combine the best of both worlds, a camera with user configurable shooting modes where the user can choose what mode they want stored and make final tweaks here and there to get the exact results they want.
Press OK to save the current settings or hit menu to cancel.
The format function formats the SD memory card. In doing so it deletes all the information stored on the disk.
Sometimes disks get corrupted when switching between camera and computer while transferring images. If this happens just format the SD card in camera and you should be good to go again.
I usually format the card after every transfer when I'm sure I won't need the images on the SD card. I have never had any corruption problems with my SD cards by doing this.
You can turn the beep function completely off or on/off for certain functions. These are in-focus, exposure lock, RAW mode (by selecting the RAW button on the left from of the camera), self timer, or remote control.
Just select the function you want to change and scroll left or right with the 4-way controller to toggle the setting on/off.
To turn the beep off all together select the Beep setting at the top and toggle it the same way with the 4-way controller.
The date adjust menu lets you choose the date format (mm/dd/yyyy, dd/mm/yyyy, or yyyy/mm/dd), change the hour format between 12 and 24 hours, and change the actual date and time.
If you have ever had to change the time on some of the newer digital clocks then this menu will be familiar.
Use the 4-way controller to scroll up/down to the style/date/time you want to change and then scroll left/right to select the day/hour/year or hour/minutes you want to change and then use the up/down controller to change the actual number.
Hit OK to save the changes. If you don't want to save your changes hit the menu button to cancel.
Pretty simple stuff.
To turn on/off world time you scroll left/right with the 4-way controller from the World Time menu. If world time is on then whatever destination timezone you have selected will be stamped on the photos. If the world time is off then the timezone for your home location will be stamped on the photos instead.
To set the destination timezone scroll down to the airplane icon and scroll left.
In the destination menu you scroll the big map to change continents from North America, South America, Europe/West Asia, Africa/Middle East, East Asia/Philippines, or Australia/New Zealand.
Then scroll down to the city name and scroll left/right to change the city within that continent. If you scroll to far left or right the continent map will change to the adjacent continent.
You can turn on daylight savings if the area you are in participates.
To change the hometown time zone go back to the main world time menu and select the house icon.
Scroll left and change the continent map and city like you did for the destination zone. Don't forget to set daylight savings time if needed so you camera will automatically adjust the time in the spring and fall. With the new dates of spring forward/fall back this year for the USA, I'm not sure if the engineers at Pentax have that programmed appropriately or not so keep an eye on it.
Here is where you set your preferred language. Scroll left to bring up the list of languages and scroll left/right/up/down to your desired language and press OK.
This function is useful to a new user who is not familiar with the camera. I have mine turned on to 3 seconds so I can get a quick visual of what the camera settings are when I turn the camera on and every time I change modes. You might want to select a longer time than 3 seconds for a while so you can read all the information on the display. Turn guide display off when you are comfortable with the camera and no longer need it.
The brightness level adjusts how bright/dim the LCD screen is. Useful for bright sunny days or night photography. Scroll left to dim and right to brighten.
Video out mode is used to select what video format you want the camera to generate. TVs in the USA use NTSC and European countries use PAL. Select the correct video output format for your TV. If the video is messed up try the other format to see if it fixes it.
The transfer mode allows you to change the transfer method of the USB port using the USB cable. For direct camera to PC transfers use PC. If you are connecting directly to a PictBridge compatible printer select the PictBridge mode. I will not go into how to print images directly from the camera as the manual does a good job of explaining that feature on pages 106-116.
I'm not entirely sure what the PC-F mode is, and all the manual says about it is in the troubleshooting section under USB error while transferring data. It says to try the PC-F mode instead.
As a general rule you if you operate on battery power and especially if you only have one battery available, you should turn the Auto Power Off feature on. This will save you from a dead battery in the event that you forget to turn the camera off or someone inadvertently turns it on.
If you run your camera in a studio with a power adapter then there is no need to have the camera turn off automatically, though I think I would still set it to 30 minutes myself so I don't leave the camera on accidentally overnight.
You can set the folder naming convention to Standard or Date. When standard is selected the folder name will be 100 for the first folder and when it contains 500 images then a second folder will be created called 101 and will continue to create new folders after every set of 500 images are recorded.
If you select the date convention then all images taken on the same day will be stored in the same folder and new folders will be created every day at 00:00 (midnight).
If you have the optional battery grip (does not come with a battery when you purchase it, what a bummer) and extra battery, you can select which battery the camera should use.
If you set to auto the camera will choose the most powerful battery and swap when it is depleted.
If you select body first then the camera will use the main camera body battery first until it is depleted and then switch.
If you select grip first then the optional battery in the grip will be use first until it is depleted.
Here is a new feature in the Pentax line up of cameras. The image sensor is covered with a special non stick coating that dust will not readily adhere to. If you have the dust removal function turned on then the image sensor will get a little shake to knock the dust off every time you power on the camera. If you put your ear to the camera when you turn it on you can hear a "thunk-thunk-thunk" as the sensor is vibrated. The dust then falls onto a sticky pad where hopefully is will stay out of harms way. I have no idea how well this feature works or how long the sticky pad is good for. I'm sure the whole mechanism will need servicing every once in a while. It could just be a marketing scheme.
I keep mine turned off but if I was in a very dusty environment where I was constantly changing lenses I might turn it on and then turn it off when I'm back shooting under less dusty conditions.
To clean the sensor properly is a complete topic in itself and I won't cover that in this blog, at least not at this point in time.
If you are into cleaning your won sensor then make sure you are plugged into an adapter or at least have fresh batteries before attempting this or the camera may turn off mid-cleaning and damage the mirror and/or shutter.
Select mirror up and press OK.
To exit sensor cleaning mode just turn the camera off.
Please read up on sensor cleaning from several different sites to explore the pros and cons before deciding to clean it yourself. You don't want the event to turn into an expensive experiment.
Also I might note that I have no idea what cleaning solvents to use on the K10D so as not to damage the non stick coating. So be wary of what you touch your sensor with.
If you want to return the camera setup to the default settings (it won't be factory default) then select reset and hit OK. It won't change things like the date/time, language, video mode, or world time settings. It does erase the USER memory space so be careful if you have a special mode stored.
It will also reset the auto power off timer, beep settings, transfer mode, guide display, brightness level, folder name, select battery, and dust removal.
And that is the end of the setup menu.
Next Article


No comments:
Post a Comment