
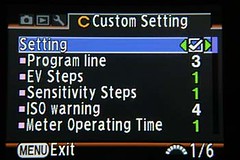
If you want to revert back to camera defaults without clearing the stored custom settings you can toggle the custom settings on and off by scrolling left/right on Setting. That's pretty handy if you mess the camera up and want to check if it is a custom setting that is set wrong or not or if you just want to use the camera defaults real quick.
(page 1/6)
Program Line
EV Steps
Sensitivity Steps
ISO Warning
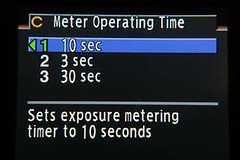
Meter Operating Time
(page 2/6)
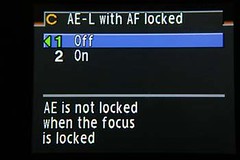
AE-L with AF Lock
Link AF Point and AE
Auto Bracketing Order
Auto EV Compensation
WB when using flash
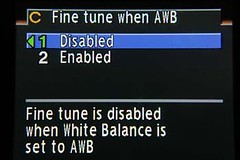
Fine tune when AWB

Normal program line is the mode you typically want to use if you are just shooting photos and don't want any particular effect like high speed shutter or shallow DOF. There is not much information available on it but it adjusts both shutter speed and aperture equally to compensate for changes in metering. Again this is what green mode uses.
High speed mode the camera tries to give you the highest shutter speed possible. If the light is too low and the aperture is already wide open (smallest number) then the shutter speed may not be fast enough to stop motion. So to use this feature to it's fullest ability you will need some light on your subject. For my test I set the program to high speed and the mode dial to P. I had the metering set to spot. I set the ISO to 1600. I then pointed the center focus to a light bulb (60W or 75W) and the camera read 1/3000 @ f6.7. As I moved the center focus away (slowly) from the light I noticed the first thing to drop was the aperture. It dropped to f4.5 before the shutter speed dropped. After f4.5 the shutter speed dropped and went down to 1/2000 before the aperture started to drop to 3.5. Then the shutter speed dropped to 1/180 before the aperture dropped to 2.8 The aperture went to 2.4 before the shutter speed started to drop again.
So the Hi Speed formula looks like this with my 70mm 2.4 at ISO 1600.
1/3000 @ f6.7 - f4.5
1/2000 @ f4.5 - f3.5
1/180 @ f3.5 - f2.4
1/90 - 30" @ f2.4
My light wasn't bright enough to get a faster shutter speed than 1/3000 and I don't think I want to stare at any thing brighter. I'm seeing spots as it is. :)
Depth mode I came to find out during my experiments is used to tell the camera to use the widest aperture (smallest number) possible. This gives you the shortest depth of field. I thought it was the opposite which to me would seem more useful. What would really be a cool feature is a toggle to switch between the two. So depending on how much light is available again will determine what the aperture will be set at. The more light the smaller the aperture will be (larger number).
Here's what I found with the same settings as above.
1/250 @ f22 - f16 (What? I had to check to make sure I was in Depth mode)
1/180 @ f16 - f9.5
1/125 @ f9.5 - f5.6
1/90 @ f5.6 - f2.4
1/45 - 30" @ f2.4
So are you as confused as I am? Why did the shutter speed max out at 1/250? You'd think the shutter speed would get up at least into the thousandths of a second before the aperture started to increase if the goal of the depth program line was to keep the aperture at minimum. I changed the ISO down to 100 and the results were 1/25 @ f8 and followed the same format as above when I moved away from the light. I'm not quite sure what to make of these results and since they don't seem to follow the program line I'd probably not use this one much. Just switch to Av or M mode and set the aperture to the desired DOF yourself.
MTF for the 70mm 2.4 Limited lens goes like this. I've moved the ISO back to 1600 btw. Starts off at 1/3000 @ f16. Moving away from the light the aperture drops to f4.5 before the shutter goes to 1/2000. Then the aperture drops to 3.5 before the shutter continues to slow down. The aperture never drops below 3.5 so it seems that is the prime sweet spot for the lens for shutter speeds under 1/2000.
So the layout for MTF looks like this:
1/3000 @ f16 - f4.5
1/2000 @ f4.5 - f3.5
1/1500 - 30" @ f3.5
Now I want to test my 18-5mm 3.5-5.6 kit lens with MTF program line.
I set the zoom to 18mm and got these results.
1/3000 @ f9.5 - f4.5
1/2000 - 30" @ f4.5
It seems f4.5 is the sweet spot on the kit lens at 18mm.
Now zoomed into 55mm and the results are:
1/4000 @ f16
1/3000 @ f16 - f6.7
1/2000 - 30" @ f6.7
It seems f6.7 is the sweet spot at 55mm.
At 35mm it was f5.6.
I could not test the upper limits of any of these program lines since I didn't have a bright enough light available and also didn't want to stare at it through the view finder all night long.
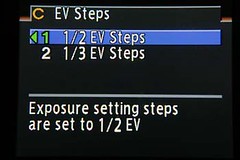
At 1/2 the steps are in 1/2 stop increments so between f8 and f5.6 there is a halfway point of f6.7.
Set at 1/3 the steps are in 1/3 stop increments so between f8 and f5.6 there are f7.1 and f6.3.
1/3 gives you finer resolution in your exposure values if you need a precise exposure.
Yes this gives us more values to worry about, but the relation between shutter and aperture is still a 1:1. If you go up a third for shutter go down a third for aperture to compensate if you need the same exposure.
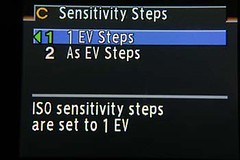
You can not select AUTO ISO when Sensitivity Steps is set to match the shutter/aperture EV steps. However if you are in TAv mode the ISO will auto adjust in steps that match your shutter/aperture EV setting.
I would find the TAv mode very useful when shooting macro in slightly windy conditions where I want a faster shutter speed and want to adjust my DOF. We'll talk more about actual shooting modes in a later article. We need to get through all the camera settings first.
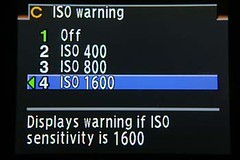
The ISO warning symbol will be displayed in the viewfinder as a warning if the ISO exceeds 400, exceeds 800, or is at 1600 depending on how you have the ISO warning set. This only works when the ISO is set manually above the warning level.
In Green, P, Tv, Av, and TAv modes you can set the minimum and maximum ISO values with the front and rear thumbwheels when ISO is set to auto (in the Fn menu). You can even set the values above the ISO warning level and no ISO warning will be displayed as it appears it is only displayed when set manually above the warning level.
When shooting in TAv mode, the ISO warning symbol is displayed constantly. If the exposure is too low (ISO 1600) or too high (ISO 100) then the shutter and aperture values will blink indicating an exposure problem.
When using the shutter button to obtain a meter reading the reading is reset as soon as your finger is taken off the shutter button.
I keep mine set to 10 seconds as that gives me plenty of time to focus and compose the scene in the viewfinder. I use this more in landscape scenes where I shoot less than 1 image per 10 seconds. When shooting scenes where the subject is moving around in different light I don't use the exposure lock button.
If you need more time set it to 30 seconds. Just remember to hit the exposure lock button to clear the meter reading before you take your next shot or it will use the last meter reading and more than likely mess up the exposure.

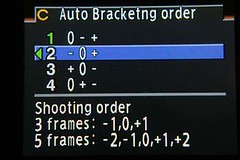
When using bracketed exposure 3 frames will cover -1, 0, and +1 where 5 frames will cover -2, -1, 0, +1, +2.
Bracketing exposures is useful when the dynamic range of the scene is greater than the camera can record. You take the bracketed exposures and combine them later post processing and with a little magic (oh it's not too hard) you will end up with all the details of the scene visible in the final image.
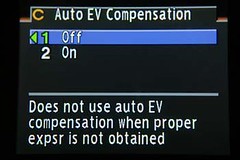
However, if you want to go manual and don't have a lot of time to make adjustments all the time and want to be sure you get the exposure in the ballpark, then by all means turn this setting on.
If you want your camera to tell you you're messing up then turn it off and pay more attention to what's happening in the viewfinder.
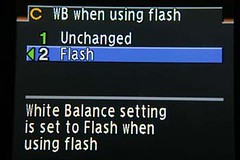
The difference between daylight and flash is not much on a Pentax as they try to get the flash output pretty close to daylight balance. However it is slightly different.
If you want to shoot the scene purposely at a certain white balance and you are using the flash for what ever reason you might want to turn this setting to unchanged. If you are shooting a closeup at a club or party and don't want the auto white balance to choose tungsten or florescent then set it to flash. The color balance on the people lit by the flash will be better this way.
I leave mine on so I have the ability if I need it or I can ignore it also if I want. And I usually do.
This is the end of the first section in the Custom Menu.
Next Article
No comments:
Post a Comment