
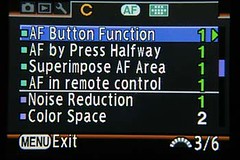
Part 2 is going to cover:
AF Button Function
AF by Press Halfway
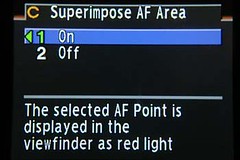
Superimpose AF Area
AF in remote control
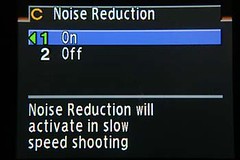
Noise Reduction
Color Space
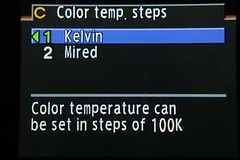
Color temp. steps
So lets get going.
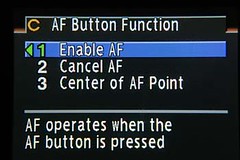
Enable focus is kind of a misnomer. One would think if you were in manual focus mode you would press the AF button and auto focus would be enabled but this is not the case. What this setting does is cause the camera to actually focus the lens just like you do normally when pressing the shutter button halfway.
The cancel autofocus setting will allow you to turn off autofocus for what ever reason. You have to continuously hold the button to keep the autofocus turned off.
The third setting, center of AF point, allows you to quickly switch from any of the focus points (in SEL mode) to the center focus point. This is faster than trying to use the 4way controller to get back to the center point

This can be useful if you want autofocus to be on but want to select it with the AF button instead. This allows you to set the focus with the AF button and then keep firing shots with the shutter release without having the camera re-focus between each shutter press. Think portrait photography where the person is staying close to the focal plane. If you are shooting with a large aperture you may want to still consider focusing on the eye between each take so you know for sure the focus is bang on. If you're shooting f8 or higher for a group shot then the focal plane will not move enough between takes to worry about and thus this setting will be very useful in speeding up the process.

Consider taking a photo where you precisely set the focus and then jump into the scene (or not) before releasing the shutter.

If all you are doing is emailing your photos then sRGB is fine. If you want to make prints then set to Adobe.
You can always convert from Adobe to sRGB in post processing if you want to both print and post on the internet.
Read thisand this, it may not may not help you understand a little more.
The settings can be either 100 kelvin or 20 mired. 100K is the same as 1,000,000/100 or 10,000M. And 20M is the same as 1,000,000/20 or 50,000K.
So this boils down to the steps being 100K and 50,000K or 10,000M and 20M. Are you confused yet?! I am!
If this is confusing you (as it is me) just leave the setting on Kelvin and forget about it.
I'm sure someone could write a dissertation about it and we'd still be no closer to understanding why Pentax choose to do the steps like they did.
OK so there ends part 2. It was a little shorter than I had envisioned, so I'll get started on part 3 and be that much closer to completing the custom menu settings.
Next article.
2 comments:
Thank you for sharing your know how on K10D. I just got this camera and still fiddling and trying all the buttons. Looking forward to read more from your day to day K10 experience.
Good reeading your post
Post a Comment