The trick we're talking about here uses a feature of the Pentax camera that fires the shutter automatically when ever something is in focus on the center focus indicator. Sorry, only the center focus indicator works in this mode. You set the camera settings and pre-focus the lens to where you anticipate the subject to be in focus and hold down the shutter button and wait for the subject to move into focus. You can pan with the subject if you want to. The only caveats are the subject has to be lit well enough for the AF sensor to see it and be under the sensor long enough for the camera to react. If both of these conditions are met then the camera will fire the shutter.
This trick will work with all Pentax and third party lenses, manual or auto focus, that have an aperture ring. The auto focus lenses require a slight temporary modification.
The trick will also work with DA lenses but you can't set any aperture. Your permanent aperture is set to the lenses minimum aperture. You also can't use the green button to calculate proper exposure. You'll have to take some test shots and chimp the histogram.
We'll start with a manual K mount lens, the lens that has no contacts on it. I have a Pentax-M SMC 50mm f1.7 and while not as good as the 1.4 model it is a very fine lens and well worth the few dollars I paid for it on e-bay.
There is no modification needed for this lens, or any manual lens that has a bright shiny metal surface in the area around the camera to lens contacts.
If you have a manual lens that has an anodized or painted surface you may have to sand the surface down until you get bare metal. If you feel you can't sand your lens for what ever reason, then you can use aluminum foil to short the camera contacts. If you can find sticky sided foil that might be the trick and stick it on the lens so it will short the camera contacts.
Now the camera settings that need to be set for this to work.
First, set the focus on the camera to AF-S. The camera has to be in auto focus mode for this trick to work as the auto focus sensors have to be activated. If you only have an AF lens at this point, don't worry, we'll get to your situation in a few paragraphs. Just follow along and set up the rest of the camera settings.
The second thing that needs to be set is the AF by press halfway setting. It needs to be on so we tell the camera to auto focus using the shutter button.
The third setting is the camera needs to be in M (manual) mode. You will have to use stop down metering to calculate the correct exposure.
The forth step is to set the aperture to the desired DoF for the subject being photographed.
To use stop down metering, with the aperture set, point the camera at the desired lighting and press the green dot button next to the camera shutter. The camera will drop the aperture to the dialed in amount and take an exposure reading. You may find with your lens that the camera is under exposed by 0.5 to 1.0 of a stop. Just dial in some EV compensation and you'll be alright.
Now to test your setup.
Point the camera at some well lit object that has good focus elements on it so the camera can respond quickly.
Purposely turn the focus ring so the object is out of focus.
Hold down the shutter button and slowly turn the focus ring so the object is coming into focus. Once the object is in focus the shutter button should fire. Do this very slowly, especially if the object is not well lit or does not have any good focus elements on it like high contrast lines.
If the shutter does not fire, then go back over the previous steps and make sure all has been accomplished. If the camera still does not fire then your lens may not be shorting the camera contacts. Some lenses have a large gap around the contacts and that needs to be filled in so the foil reaches the contacts.
If all is well at this point you can head off to your photo shoot and pre focus the lens, hold down the shutter button and wait for the subject to come into focus.
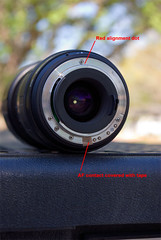
OK, for you AF only lens folks out there, here is what you need to do to trick the camera into thinking your lens is a manual lens. Find the red alignment dot on your lens. Find the contact 180 degrees from the red dot and cover it with some tape. Use tape that is thin. Do not use grip tape or duct tape as it is too thick and the duct tape will leave residue.
Those of you that are trying to get this to work with your DIY homebrew cable release, there is an easy mod to your cable release to get this to work and a great trick to put your camera in full auto shutter mode that will continually take photos while something is in focus. This is the "real" focus trap in the sense you trap the subject in the camera as an image when they trip the sensor. Great for remote wildlife shooting and bird feeder shots.


3 comments:
Thank you, very nice.
Your very welcome.
Hello nice posst
Post a Comment