
I used the mouse because I had an old wheel mouse lying around and it saved me from buying 2 switches and an enclosure. Plus I could not find an enclosure that fit my hand better than the mouse did. The cable is a 2.5mm stereo extension cable from Radio Shack. The cost of the cable was cheaper than buying the jack and a roll of wire separately. I could have saved a few dollars buying online but I needed/wanted the remote switch right away.
The first thing to do is find all the screws holding your mouse together and remove them. Look under stickers and the slide guides on the bottom of your mouse. Once all the screws are removed then you can carefully pry the mouse enclosure open to reveal the circuit board.
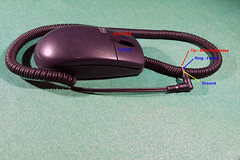
Next you cut the jack (female) end off of the Radio Shack extension stereo cable and strip the insulation back to reveal the 4 wires. Once the bare copper is exposed, separate the wire so they are not shorting on each other. Plug the cable into the camera's remote jack. Turn the camera on. Touch a wire pair together and see what that pair does. One pair should activate the focus mechanism and the other should release the shutter. Mark what wire pair does what so you solder the correct wire to the switches on the circuit board. Remove the cable from the camera remote jack.
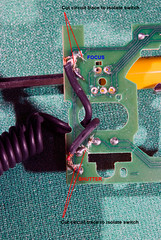
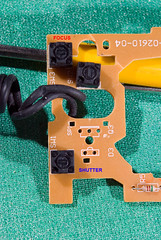
Next solder each wire pair, one wire to each contact on the switch. You can test your work here before you reassemble the mouse enclosure. Press each micro switch and make sure the camera does what it's supposed to. If not then recheck your solder and make sure the switch is isolated from the rest of the circuit by cutting all the traces around the switch.
Now position the extension cable where it will exit the enclosure and reassemble the enclosure aligning all the snaps and catches properly and pressing the 2 pieces together. Reinstall all the screws and you're done.
You can attach any kind of switch (other than the mouse switches) to the cable, sound/motion/light activated or even a timer project using a T555 timer chip. These are all great camera shutter release triggers for all kinds of remote photography. While you're at it, make an extension cable from a long piece of 4 conductor (telephone) wire and solder a 2.5mm jack on one end and and a 2.5mm plug on the other. Now you can fire the shutter release from a secluded location. The motion detector and some wireless flashes would be great for a humming bird feeder setup.
What ever you decide to do with the remote cable release, have fun with it.
Until next time, keep shooting.
PS - You will notice I did not add a bulb switch to this project. It is a planned future project when I get a switch. I didn't want to buy one at the time and haven't needed a bulb switch in the last few years.
No comments:
Post a Comment