

Let's get going.
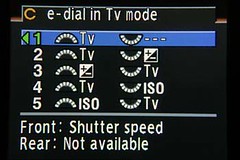
The first setting sets the front e-dial to control the Tv or shutter speed and the rear dial to change Av or the aperture. When in program mode you can now adjust the shutter speed if you want to use a longer or shorter speed for blur or stop motion effects. This is also the camera default setting.
The second setting is basically the reverse. If you'd prefer to have the front dial change the Av and the read dial adjust the Tv then use that setting.
The third setting sets the front dial to adjust the exposure compensation. It pretty much does this already, only you have to press the compensation button along with it. With the e-dial set to this setting you can now change the compensation without pressing the EV +/- button. If you can hit the +/- button while looking through the viewfinder then this setting won't be of much use to you. However if you find yourself using EV compensation a lot and have to take you eye away from the viewfinder to locate the +/- button then you're going to find this setting very useful. The rear dial controls the Av.
The fourth setting is the opposite of the third.
The fifth setting turns off the e-dials all together.

The first setting disables the front dial and sets the rear dial to change the sensitivity or ISO level of the camera.
The second setting the front dial changes the Av and the rear dial changes the ISO.
The third setting is the opposite of the second.
You can change the shutter speed (Tv), the exposure compensation (+/-), and the sensitivity (ISO).
The first setting has the front dial change the shutter speed and the rear dial is disabled.
The second setting has the front dial adjust shutter speed and the rear dial adjusts the exposure compensation.
The third setting is the opposite of the second.
The fourth setting has the front dial again adjust the shutter speed while the rear dial adjusts the sensitivity or ISO value.
The fifth setting is the opposite of the fourth.
In Tv mode and the ISO is set low, when you set the shutter speed high enough in dim lighting conditions the aperture will eventually bottom out. At this point the camera will indicate an under exposure condition by flashing the Tv and Av numbers in the view finder. You can adjust the ISO until the Av stops flashing or hit the green dot button and the camera will turn to auto ISO mode and the ISO will adjust to obtain the proper exposure.
[edit]From the comment from Bob, if you press the OK button while ISO is displayed in the viewfinder, the number of remaining shots left on the memory card is displayed.[edit]

Same thing on the ISO, green dot, and OK buttons.
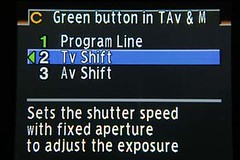
When set to program line it will adjust according to what the program line is set to.
Set to Tv shift it will keep the current Av setting and adjust the Tv to obtain the proper exposure.
Set to Av shift it will adjust the Tv to obtain the proper exposure.
If you have a lens with an aperture ring and it is not set to A then the Av shift will not work.
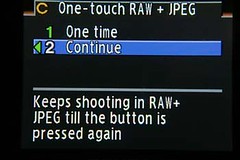
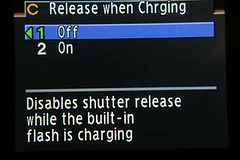
If you shoot mainly in JPEG but once in a while want to shoot a RAW then you might want to set this to the first setting, one time.
If you shoot RAW + JPEG mostly then set this to 2 so it will continuously shoot in RAW + JPEG.
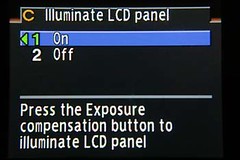
You turn the LCD light on by pressing the +/- button. The light will stay on for about 5 seconds.
It does not work when an external flash is used on or off camera.
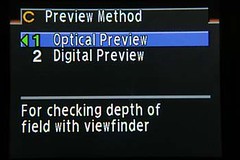
To take a preview image turn the on/off switch all the way clockwise past the on label on the switch. You will hear the camera stop down the aperture. If you are in digital preview then you will also hear the camera shutter release.
And that is the end of part three.
Next article
4 comments:
Program Shift (P-Shift) adjusts both aperture and shutter simultaneously in opposite directions, thus maintaining the same exposure value.
In Tv and Av modes, programming one e-dial to ISO makes ISO always visible in the viewfinder and instantly adjustable with a dial. Now ISO control has equal status with shutter and aperture. The OK button then shows # shots remaining and the Green button switches to Auto ISO.
Thanks for the comment Bob.
Yes, both aperture and shutter change, but the aperture is the setting that the dial adjusts and the camera will set the shutter to where it needs to be for proper exposure. This is evident if you move the camera around you will see the aperture stays constant while the shutter speeds adjusts to compensate for different metering conditions.
After using P-Shift, say in Sv mode with high ISO, try aiming at bright and dim areas. The camera will auto adjust BOTH aperture and shutter as you move, though the shutter may change first. The Green button resets them to the Program Line.
In contrast, in Av and Tv modes, the aperture or shutter stay where you put them and the camera auto adjusts the other.
I like your blog, and I love the Pentax K10D!
Thanks Bob, will have to try that. I only tested in my computer room with normal room lighting.
I appreciate the comments. Keep them coming!
Post a Comment